How to Understand IR Receiver Module – Working and Applications
Introduction – What Is an IR Receiver and Where It’s Used
An IR receiver module is a compact electronic device that detects infrared light signals. It’s widely used in electronics engineering projects, automation systems, and IoT applications. These modules are essential in remote control systems, sensor-based automation, and wireless data transmission.
In Lahore, students working on final year projects at QKZee Technologies use IR modules for building Arduino robots, smart home systems, and industrial projects. Located near Hall Road, the hub of Pakistan’s electronics market, QKZee provides best engineering services and high-quality electronics parts for student projects at the best price.
How It Works – Infrared Light Detection and Signal Decoding
The IR receiver module operates by detecting infrared light signals transmitted from an IR remote control or IR LED. These signals are invisible to the human eye but can be captured and converted into electrical pulses by the receiver.
When an IR transmitter sends a modulated signal, usually at 38 kHz, the receiver detects and filters it. It then decodes the data and sends a digital output to the microcontroller, like an Arduino or ESP32.
This simple yet powerful IR communication method enables devices to perform specific functions — such as turning on a TV, controlling a robot, or automating a system.
Why 38 kHz? The receiver is tuned to 38 kHz so it ignores steady infrared light from sunlight and room lighting. Only the remote’s rapidly blinking 38 kHz signal gets through — that is why a TV remote works in a bright room but an IR receiver still gets confused by direct sunlight (see the FAQs).
Types of IR Receiver Modules
Different IR receivers are used based on project requirements. The most common types include:
1. TSOP1738
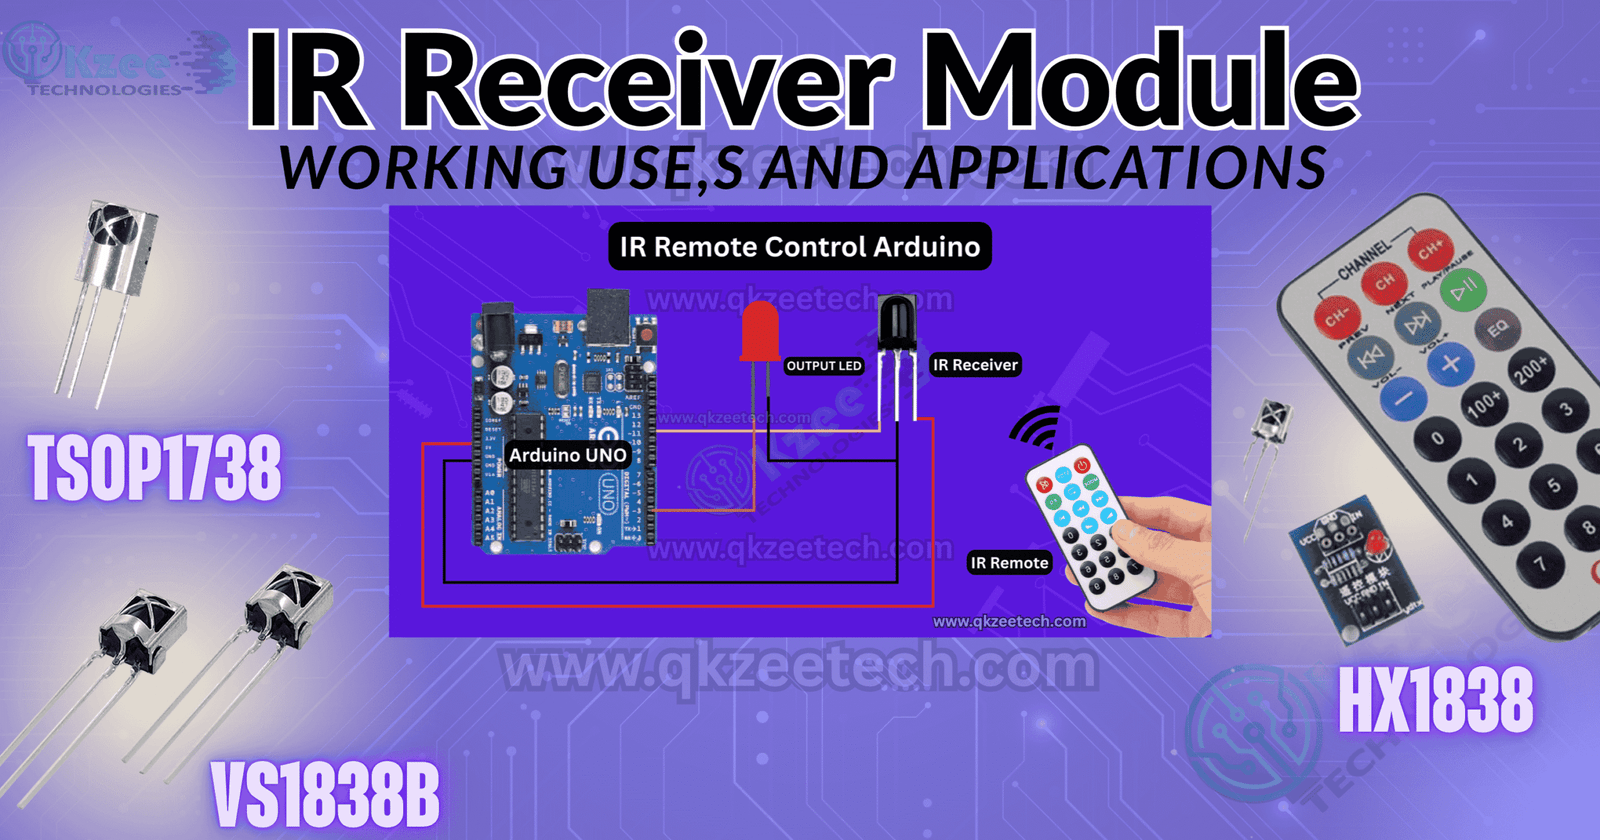
The TSOP1738 is a highly sensitive and reliable IR receiver, ideal for Arduino projects and DIY systems. It operates at 38 kHz and provides noise-free digital output.
2. VS1838B
This model is compact and cost-effective. It’s commonly used in consumer electronics and school projects.
3. HX1838
Known for its compatibility with Arduino kits, it’s a great option for students who are just starting out in electronics engineering.
All three types do the same job — receive a 38 kHz IR signal and output it as a digital pulse. They are interchangeable in the circuit below; only the pin order on the module can differ, so always check the printing on your module (VCC, GND, OUT) before wiring it up.
Applications – IR Receiver Module in Real-World Projects
IR receiver modules are essential in various fields, including robotics, industrial automation, and IoT. Let’s look at the most common applications:
1. Remote Control Systems
IR receivers are used in TV remotes, air conditioners, and Arduino-based control systems. When you press a button on a remote, the IR receiver module decodes the signal to execute the action.
2. Obstacle Detection in Robots
In Arduino robots, IR sensors detect obstacles and help avoid collisions. These DIY projects are popular among students at QKZee Technologies Lahore.
3. Wireless Communication
IR modules enable short-range wireless communication between two devices. This is perfect for university projects involving IR data transmission.
4. Industrial Automation
In industrial projects, IR sensors help monitor movement, detect objects, and enhance automation efficiency.
Arduino Example Project – IR Remote Control Setup
Let’s learn how to use an IR receiver module with Arduino to create a simple remote control project.
Required Components
- Arduino UNO (Rs 1,200)
- IR receiver (TSOP1738 or VS1838B) — available on order, message us on WhatsApp
- IR remote control — available on order, message us on WhatsApp
- Jumper wires (Rs 180)
- Breadboard (Rs 250)
Circuit Connections
- Connect the OUT pin of the IR receiver to Arduino digital pin 11.
- Connect VCC to 5V and GND to ground.
- Upload the code below to read button signals.
Arduino Code
This sketch uses the IRremote library (version 3 or 4). Install it from the Arduino IDE: Sketch → Include Library → Manage Libraries → search “IRremote” → Install.
#include <IRremote.hpp>

const int receiverPin = 11;  // IR receiver OUT pin
const int ledPin = 13;       // Built-in LED

void setup() {
  Serial.begin(9600);
  pinMode(ledPin, OUTPUT);
  IrReceiver.begin(receiverPin, ENABLE_LED_FEEDBACK);
  Serial.println("Press a button on the remote...");
}

void loop() {
  if (IrReceiver.decode()) {
    // Print the received code in hexadecimal
    Serial.print("Code: 0x");
    Serial.println(IrReceiver.decodedIRData.command, HEX);

    // Turn the LED on for one button, off for another
    if (IrReceiver.decodedIRData.command == 0x45) {
      digitalWrite(ledPin, HIGH);
      Serial.println("LED ON");
    }
    if (IrReceiver.decodedIRData.command == 0x46) {
      digitalWrite(ledPin, LOW);
      Serial.println("LED OFF");
    }

    IrReceiver.resume();  // Ready for the next button press
  }
}
When you press a button on the remote, the Arduino serial monitor displays a unique hexadecimal code. Note the code for each button on your remote — the values 0x45 and 0x46 above are examples; your remote will send different codes. Replace them with the codes your own remote sends, and you can then program actions like turning ON/OFF an LED or controlling a robot motor.
Note on the library version: this code uses the IRremote v3/v4 API (#include <IRremote.hpp> and IrReceiver.begin(...)). The old v2 API was removed in IRremote v3 (2021) and will not compile with the current library. For the full version history and a step-by-step setup, see our IR Receiver KY-022 guide.
This setup is one of the best engineering projects for beginners in Lahore and helps understand how to make and how to use IR communication effectively. A natural next step is our IR remote control project, which turns the same receiver into a full remote-controlled switch.
Troubleshooting Tips – Common Issues and Fixes
IR projects sometimes fail due to simple mistakes. Here’s how to fix them:
- No signal detection? Check if the receiver faces the remote directly.
- Random values? Reduce interference from sunlight or fluorescent lights.
- No output? Ensure proper connection of VCC, GND, and OUT pins.
- Weak response? Replace the remote batteries or use a new IR LED.
At QKZee Technologies Lahore, engineers help students troubleshoot such issues during final year project consultations. The same receiver is also the input for a full home automation system with Arduino — one remote can switch four relays on and off.
Conclusion – Expanding IR-Based Projects
The IR receiver module is an incredible tool for students and engineers learning about IR communication and automation. It’s affordable, simple to use, and extremely versatile.
From Arduino projects to industrial automation, it powers countless innovations. Whether you’re at QKZee, Hall Road Lahore, or any electronics shop near you, you can find IR modules at the best price in Pakistan for your science and engineering projects.
Still Stuck?
If your remote’s codes won’t show up, the receiver gives random values, or the LED won’t switch, message us on WhatsApp and we’ll help you debug it — or watch the build on our YouTube channel.
Frequently Asked Questions
Q1: Why does the IR receiver work at 38 kHz?
Because the receiver is tuned to 38 kHz, it ignores steady infrared light from the sun and room lights. The remote blinks its IR LED on and off 38,000 times a second; only that blinking signal gets through the receiver’s filter, so it can tell a real remote signal apart from background infrared.
Q2: Does the IR receiver work in sunlight?
Poorly. Direct sunlight floods the receiver with infrared light and drowns out the remote’s signal. Test your project indoors, or shade the receiver from direct sun. Fluorescent tube lights can cause the same problem — they flicker in a way the receiver can pick up.
Q3: Which Arduino pin should the receiver use?
Any digital pin works, but the IRremote library works best on the pins the library recommends for your board. This guide uses D11 on the Uno, matching the wiring table above. If you move the receiver to another pin, change receiverPin in the code to match.
Q4: Why do I get random codes on the serial monitor?
Usually interference — sunlight, a fluorescent light, or another remote in the room. Move indoors, shade the receiver, and check that VCC is 5V and GND is solid. If the codes change every time you press the same button, your remote may use a protocol the library decodes differently — print the raw decodedIRData.protocol value to see which protocol it is.
Q5: Can I use any TV remote with this setup?
Yes, almost any infrared TV, AC or set-top-box remote works — the receiver only cares that the remote blinks at 38 kHz. Each button sends its own hex code, so just read the codes from the serial monitor and use them in your sketch. Bluetooth and Wi-Fi remotes will not work with an IR receiver.