- +92-302-8577025
- qkzeetech@gmail.com
- shop 20, 1st floor Al-khalil Center Hall Road , Lahore
Infrared (IR) remote technology powers countless devices around us. From televisions and air conditioners to music systems, IR is everywhere. Learning how it works through an Arduino IR remote control project is exciting and highly practical. Moreover, this project is perfect for student projects, school science fairs, university experiments, and final year projects in Lahore.
If you often search for "engineering projects near me", this one stands out. It's affordable, simple to build, and teaches the fundamentals of electronics engineering, automation, and IoT. It also connects you with the best engineering services and electronics parts in Lahore at the best price.
Students gain more than just a working project. They explore real-world communication protocols and understand how devices talk to each other. In addition, they practice Arduino coding and improve problem-solving skills. Finally, projects like this prepare them for larger ventures in IoT, robotics, and automation.
To get started, gather these items:
With just these parts, you can assemble a working Arduino IR remote project in no time. The basic build costs Rs 1,791.
Finding components is easy if you know where to look. Hall Road Electronics Market in Lahore is a top destination for affordable items. Furthermore, trusted suppliers like QKZee Technologies provide electronics parts at the best price and help students with final year projects.
Therefore, whether you're in Lahore or elsewhere in Pakistan, sourcing components for your engineering projects won't be a problem.
Connecting the components is straightforward.
This setup helps you test signals before adding relays or complex devices. In addition, you can expand it later for automation.
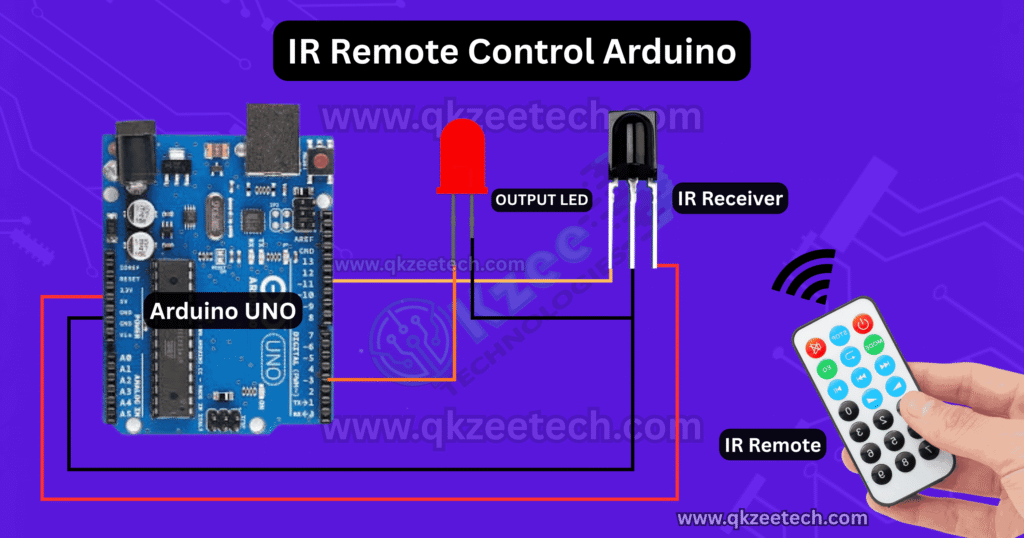
A note on the receiver pins: most IR receiver modules (TSOP1738, VS1838B, HX1838) have three pins — OUT, GND, VCC. The pin order varies by module, so check the markings printed on your module before wiring. The receiver's OUT pin is 5V-tolerant on the Arduino side, so no resistor is needed between OUT and D11.
For the receiver setup in more detail, see our IR receiver KY-022 guide and our IR receiver module guide.
Install the IRremote library in the Arduino IDE first (Library Manager → search "IRremote" → install the latest version, v3 or v4). Then, upload this basic code:
#include <IRremote.hpp>

const int RECV_PIN = 11;   // IR receiver OUT pin
const int led = 3;         // LED pin

void setup() {
  Serial.begin(9600);
  IrReceiver.begin(RECV_PIN, ENABLE_LED_FEEDBACK);
  pinMode(led, OUTPUT);
}

void loop() {
  if (IrReceiver.decode()) {
    // Print the hex code of the button pressed
    Serial.println(IrReceiver.decodedIRData.decodedRawData, HEX);

    // Toggle the LED when the power button (0xFFA25D) is pressed
    if (IrReceiver.decodedIRData.decodedRawData == 0xFFA25D) {
      digitalWrite(led, !digitalRead(led));
    }

    IrReceiver.resume();  // ready for the next button press
  }
}
Why this version and not the old one: the old code in this post used the IRremote v2 API (irrecv.decode(&results), results.value, irrecv.resume()). That API was removed in IRremote v3 (2021), so the old code will not compile with any IRremote version installed today. This version uses the current v3/v4 API and does exactly the same thing — it listens for IR signals, displays their HEX values, and toggles the LED. Moreover, you can replace the LED with relays to control appliances.
The hardware detects IR light and converts it into signals Arduino can process. The software, written in Arduino IDE, decodes those signals into commands.
As a result, pressing a button on the remote triggers a clear action. On the other hand, you can assign multiple functions for different buttons, making the project highly versatile.
Testing is simple. First, upload the code. Next, open the Serial Monitor and press a button on the remote. If you see HEX codes, the IR receiver works.
After that, match those codes with specific outputs, such as turning on lights or running a fan. Finally, troubleshoot wiring if the codes don't appear.
The project goes beyond blinking LEDs. You can:
Therefore, this project is not only educational but also practical.
Students in Lahore and Pakistan look for projects that balance cost and impact. The Arduino IR remote project fits perfectly. The basic build costs Rs 1,791 at QKZee (UNO Rs 1,200 + breadboard Rs 250 + jumper wires Rs 180 + LED Rs 6 + relay Rs 155), while advanced versions with relays or IoT may cost more depending on parts.
Thus, it's an excellent choice for final year projects, university demonstrations, and school-level science projects.
Ready-made kits are available, but DIY projects teach far more. You learn by building, wiring, and debugging. Moreover, you save money while gaining practical electronics knowledge.
As a student, starting with projects like this makes advanced work in automation, IoT, and robotics much easier.
Once your IR remote project works, you can scale it. For example, add relay modules to control appliances directly. Furthermore, include ESP8266 Wi-Fi modules (Rs 590) to connect devices to the internet.
Eventually, you could build a complete home automation system powered by Arduino and IR.
This project is more than just toggling LEDs. It equips you with skills in Arduino coding, IR signal processing, automation, and IoT concepts. In addition, it's budget-friendly and perfect for final year projects in Lahore or Pakistan.
Whether you source parts from Hall Road Electronics Market or rely on QKZee Technologies, you'll complete a project that truly stands out.
If no codes appear in the Serial Monitor, the LED never toggles, or the remote works only sometimes, message us on WhatsApp and we'll help you debug it — or watch the build on our YouTube channel.
Chat on WhatsApp Watch on YouTube
Q1: Will any TV remote work with this project?
Yes — almost any infrared remote (TV, AC, set-top box) works. The receiver only cares that the remote sends 38 kHz IR pulses, which nearly all of them do. Press a button, read its hex code from the Serial Monitor, and use that code in your sketch. The power button's code is different on every remote, so you must read your own remote's codes first — do not copy the 0xFFA25D in the example blindly.
Q2: Why do no codes appear in the Serial Monitor?
Check three things in order: (1) the receiver's OUT pin is on D11 and VCC is 5V (not 3.3V); (2) the IRremote library is installed — the code will not compile without it, and the IDE will say so; (3) the remote actually has working batteries and is pointed at the receiver. Also check that no bright sunlight is hitting the receiver — sunlight floods it with IR and drowns out the remote.
Q3: How do I find a button's hex code?
Upload the sketch, open the Serial Monitor at 9600 baud, and press the button. The code prints the button's hex value (like 0xFFA25D) on one line per press. Write the code down, then use it in an if statement to trigger whatever you want — an LED, a relay, a buzzer.
Q4: Does sunlight really break IR remotes?
Yes. Sunlight contains a lot of infrared, and a receiver in direct sun cannot tell the remote's pulses apart from the sun's IR. The project works reliably indoors and in shade. If you must use it near a window, shield the receiver with a small tube or point it away from the light.
Q5: Can I control a fan instead of an LED?
Yes — replace the LED with a relay module. Wire the relay's IN pin to D3 (the same pin the LED used), the relay's COM to the fan's live wire, and the fan's other wire straight to neutral — never switch the neutral through the relay. The code stays exactly the same: the same digitalWrite that toggled the LED now toggles the relay. For the full relay wiring, see our home automation guide linked above.