How to Build a Voice-Controlled Robot Using Arduino and Bluetooth
Voice-controlled gadgets are everywhere now — smart speakers, home automation, hands-free everything. This project brings the same idea to a small robot: you speak a command into a phone app, the phone sends it over Bluetooth, and an Arduino drives the robot forward, backward, left or right. It is a popular final year project for students in Pakistan because it combines Bluetooth, Arduino and motor control in one build you can demonstrate live.
This guide builds the full system: an HC-05 Bluetooth module receives the voice command as text, the Arduino reads it, and an L298N motor driver runs the two gear motors on a 2WD robot car chassis. No joystick, no remote — just your voice.
How the System Works
- You speak into a voice-control app on your phone (for example AMR Voice). The app turns your speech into text and sends it over Bluetooth.
- The HC-05 Bluetooth module receives the text and passes it to the Arduino over a serial connection.
- The Arduino reads the word — “forward”, “back”, “left”, “right” or “stop” — and sets the L298N motor driver outputs to drive the wheels.
- If no command arrives for more than 2 seconds, the robot stops by itself, so it never keeps driving on a lost signal.
The phone never talks to the motors directly. It only sends short text commands; the Arduino decides what the motors do.
Main Components Needed
| Component | Price / link |
|---|---|
| Arduino UNO R3 DIP | Arduino UNO R3 DIP ATmega328P with USB Cable — Rs 1,200 |
| HC-05 Bluetooth module | No QKZEE listing — available at the Hall Road shop on request |
| L298N motor driver | L298N Dual H-Bridge Motor Driver — Rs 375 |
| 2WD robot car chassis kit (chassis + 2 gear motors + wheels + caster wheel) | 2WD 2 Wheel Smart Robot Car Chassis Kit for Arduino — Rs 920 |
| 18650 Li-ion cell 2000mAh × 3 (12V power: three cells in series) | 18650 Lithium-Ion Rechargeable Cell 2000mAh — Lot Rs 200 / New Rs 250 each |
| Single cell 18650 battery holder × 3 | Single Cell 18650 Battery Holder — Rs 45 each |
| MB102 breadboard (for testing on the bench) | MB102 Breadboard 830 Points — Rs 250 |
| 40-pin jumper wires | 40-Pin Jumper Wires 30cm — Rs 180 |
| Android phone with a Bluetooth voice app | Your own phone |
A 9V PP3 battery cannot drive these motors — it gives too little current. Use the 12V supply above (three 18650 cells in series).
Wiring
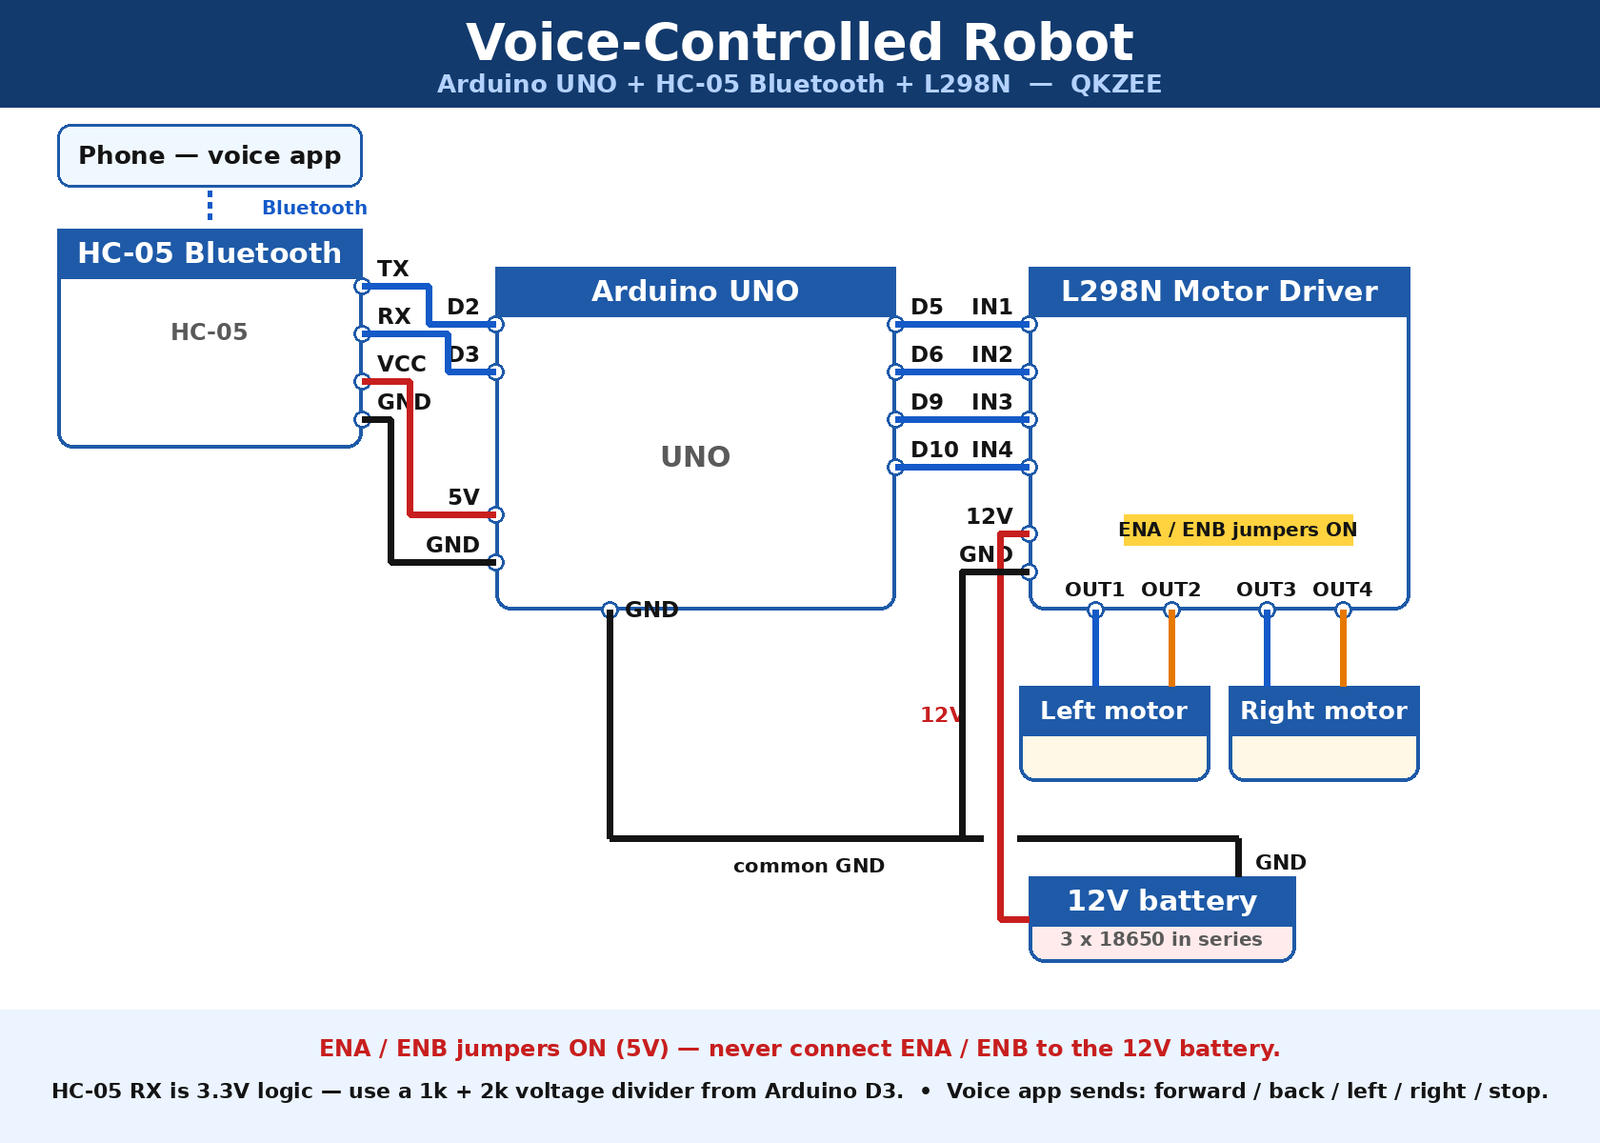
HC-05 Bluetooth Module → Arduino
The HC-05 connects on SoftwareSerial pins D2/D3 — not on the hardware serial pins D0/D1. That matters: D0/D1 are used by the USB connection, so a module wired there must be disconnected every time you upload code. On D2/D3 you can leave it connected.
| HC-05 pin | Arduino pin |
|---|---|
| TX | D2 |
| RX | D3 (through a 1k + 2k voltage divider — the HC-05 RX pin is 3.3V logic) |
| VCC | 5V |
| GND | GND |
The voltage divider matters: the Arduino sends 5V on D3, but the HC-05 RX pin is a 3.3V pin. Without the divider it may work for a while and then fail. Connect D3 → 1k resistor → HC-05 RX, and HC-05 RX → 2k resistor → GND.
L298N Motor Driver → Arduino
| L298N pin | Arduino pin |
|---|---|
| IN1 | D5 |
| IN2 | D6 |
| IN3 | D9 |
| IN4 | D10 |
| ENA / ENB | Jumpers ON (the module’s own 5V — see the warning below) |
| 12V + GND | 12V battery (three 18650 cells in series) |
| OUT1 / OUT2 | Left motor |
| OUT3 / OUT4 | Right motor |
Connect the battery negative to the L298N GND and to the Arduino GND as well — a common ground is essential, otherwise the motor signals have no return path and the motors will not run. Power the Arduino from its own 5V power bank through USB, not from the 12V battery.
Do not connect ENA / ENB to the 12V battery. ENA and ENB are 5V logic enable pins — 12V on them can damage the L298N module and the Arduino. With the jumpers left ON, the module feeds them its own 5V and the motors run at full speed. (If you want speed control later, remove the jumpers and drive ENA/ENB from two PWM pins instead — never from 12V.)
The L298N is a motor driver (a dual H-bridge) — it switches the battery power to the motors and sets their direction. It does not “supply regulated power” to them; the 12V battery is the power source.
Required Libraries
None. SoftwareSerial is built into the Arduino IDE — no install needed.
Complete Arduino Code
/*
  Voice-Controlled Robot — Arduino UNO + HC-05 + L298N
  The phone app sends a voice command as text over Bluetooth
  ("forward", "back", "left", "right", "stop").
  The sketch also accepts single letters: F / B / L / R / S.
  Safety stop: no command for 2 seconds means the motors stop.
  HC-05 on SoftwareSerial D2/D3, so it stays connected while uploading.
  ENA / ENB jumpers stay ON (5V). NEVER connect ENA/ENB to 12V.
*/

#include <SoftwareSerial.h>

SoftwareSerial bt(2, 3);   // HC-05: TX -> D2, RX -> D3

const int IN1 = 5, IN2 = 6, IN3 = 9, IN4 = 10;

unsigned long lastCmd = 0;

void setup() {
  Serial.begin(9600);
  bt.begin(9600);
  pinMode(IN1, OUTPUT);
  pinMode(IN2, OUTPUT);
  pinMode(IN3, OUTPUT);
  pinMode(IN4, OUTPUT);
  stopMotors();
  Serial.println("Voice robot ready. Speak a command in the app.");
}

void loop() {
  if (bt.available()) {
    String cmd = bt.readStringUntil('\n');
    cmd.trim();
    cmd.toLowerCase();
    lastCmd = millis();

    if (cmd.indexOf("forward") >= 0 || cmd == "f")      forward();
    else if (cmd.indexOf("back") >= 0 || cmd.indexOf("reverse") >= 0 || cmd == "b") backward();
    else if (cmd.indexOf("left") >= 0 || cmd == "l")    left();
    else if (cmd.indexOf("right") >= 0 || cmd == "r")   right();
    else if (cmd.indexOf("stop") >= 0 || cmd == "s")    stopMotors();

    Serial.print("Heard: ");
    Serial.println(cmd);
  }

  // Safety stop: no command for 2 seconds means the link is gone.
  if (millis() - lastCmd > 2000) {
    stopMotors();
  }
}

void forward()  { digitalWrite(IN1, HIGH); digitalWrite(IN2, LOW);  digitalWrite(IN3, HIGH); digitalWrite(IN4, LOW); }
void backward() { digitalWrite(IN1, LOW);  digitalWrite(IN2, HIGH); digitalWrite(IN3, LOW);  digitalWrite(IN4, HIGH); }
void left()     { digitalWrite(IN1, LOW);  digitalWrite(IN2, HIGH); digitalWrite(IN3, HIGH); digitalWrite(IN4, LOW); }
void right()    { digitalWrite(IN1, HIGH); digitalWrite(IN2, LOW);  digitalWrite(IN3, LOW);  digitalWrite(IN4, HIGH); }
void stopMotors(){ digitalWrite(IN1, LOW); digitalWrite(IN2, LOW);  digitalWrite(IN3, LOW);  digitalWrite(IN4, LOW); }
What the Code Does
- Listens on the Bluetooth serial connection for a line of text and converts it to lowercase, so “Forward”, “FORWARD” and “forward” all work.
- Matches whole words — “move forward” works because it contains “forward”, and “turn right” works because it contains “right”. Single letters (
F,B,L,R,S) work too, for apps that send letters. - Sets the four L298N inputs for forward, backward, left spin, right spin or stop. Left and right spin the robot in place (one side forward, one side backward).
- Stops the motors if no command arrives for 2 seconds, so a lost Bluetooth link never leaves the robot driving.
Setting Up the Voice App
- Install a Bluetooth voice-control app on your Android phone — “AMR Voice” is the one most students use; any app that sends the recognised speech as text over Bluetooth works the same way.
- Pair the phone with the HC-05 (default PIN is usually
1234). The HC-05 LED blinks twice per second when a phone is connected. - In the app, connect to the HC-05, tap the microphone, and say “forward”. The robot should move forward. Try “stop”, “left”, “right” and “back”.
- Speak clearly and use the exact words above — the sketch matches those words. “Go forward please” works (it contains “forward”); “move ahead” does not, because the sketch has no rule for “ahead”.
How to Make the Robot
Step 1: Assemble the Chassis
Mount the two gear motors, wheels and caster wheel on the chassis kit as its instructions show. Fix the L298N, Arduino and battery holders on top with screws or double-sided tape.
Step 2: Wire the Modules
Wire the HC-05 and L298N as in the tables above. Join all grounds together. Keep the HC-05 RX voltage divider in place.
Step 3: Upload the Code
Upload the sketch with the Arduino IDE. The HC-05 can stay connected — it is on D2/D3, not on the USB serial pins.
Step 4: Pair and Test
Pair the phone with the HC-05, connect in the app, and test each command on the floor with the robot’s wheels free — hold it up first so a wrong direction cannot drive it off the table.
Testing the System
- Test Bluetooth first. Open the Serial Monitor at 9600 baud, say “forward” in the app, and check the monitor prints “Heard: forward”. If nothing prints, the phone is not connected to the HC-05 — re-pair and check both run at 9600 baud.
- Test the motors. Say “forward” — both wheels should drive forward. If one side runs backward, swap that motor’s two wires on the L298N output.
- Test every direction. Say “left”, “right” and “back” and check the robot turns and reverses. If left and right are swapped, swap the
LandRrules in the sketch. - Test the safety stop. Close the app while the robot is moving — it must stop within about 2 seconds.
Troubleshooting
- Serial Monitor prints nothing: the phone is not connected to the HC-05. Check pairing (PIN
1234), that the app is connected to the HC-05 (not just paired), and that TX/RX are not swapped (module TX → Arduino D2). - “Heard:” prints but the motors do not move: check the 12V battery is connected to the L298N 12V terminal, the ENA/ENB jumpers are ON, and the battery negative, L298N GND and Arduino GND are all joined (common ground).
- One side runs backward: swap the two wires of that side’s motor on the L298N output terminals.
- The robot moves on “forward” but ignores “stop”: the app may be sending the word without a newline — the sketch reads up to the 1-second timeout, so the word still arrives, just a second late. If it never arrives, try another voice app.
- Garbled text in the Serial Monitor: the HC-05 RX divider is missing or wrong — the module’s RX pin is 3.3V logic and 5V from D3 corrupts it. Fit the 1k + 2k divider.
- Upload fails while the HC-05 is connected: the module is wired to D0/D1 (hardware serial) instead of D2/D3. Move it to D2/D3 as wired above.
Applications
- School and college projects — a complete Bluetooth + Arduino + motor-control system in one build.
- Final year projects — live voice control is easy to demonstrate to judges.
- Assistive-technology demos — shows how voice can drive a machine hands-free.
- A base for your own version — add an ultrasonic sensor that stops the robot before obstacles, or speed control with the ENA/ENB pins driven from PWM outputs.
Where to Buy the Components
The Arduino UNO, L298N, 2WD chassis kit, 18650 cells and holders, breadboard and jumper wires are available at QKZEE Technologies, Shop 20, 1st Floor, Al-Khalil Center, Hall Road, Lahore, and online at qkzeetech.com with delivery all over Pakistan — see the links above. The HC-05 Bluetooth module is available at the Hall Road shop on request.
Still Stuck?
If the robot does not move, or the app never connects, message us — tell us what the Serial Monitor shows and which step you are on, and we will help you find the fault.
FAQs
Which voice app should I use?
AMR Voice is the one most students use — it sends the recognised speech as text over Bluetooth. Any app that sends speech as text works the same way with this sketch.
Why must the HC-05 use D2 and D3 instead of D0 and D1?
D0 and D1 are the USB serial pins. A module wired there blocks code uploads and fights with the Serial Monitor. On D2/D3 (SoftwareSerial) the module stays connected while you upload and debug.
Can I use an HC-06 instead of an HC-05?
Yes for this project — the HC-06 is slave-only, and here the phone connects to the module, so slave mode is all it needs. The wiring and the sketch are identical.
Will it work without the voltage divider on HC-05 RX?
It may work for a while, but the Arduino sends 5V into a 3.3V pin, which can corrupt the data or damage the module over time. Fit the 1k + 2k divider — two resistors cost almost nothing.
Can I add speed control?
Yes. Remove the ENA/ENB jumpers and drive ENA and ENB from two PWM pins (for example D3 and D11 on the UNO — move the HC-05 to other pins first), then use analogWrite() to set the speed.
Why does the robot stop 2 seconds after the last command?
That is the safety stop in the sketch. If the Bluetooth link drops, the robot stops instead of carrying on with the last command.
Conclusion
Building a voice-controlled robot brings together speech recognition, Bluetooth and motor control in one project. Wire the HC-05 on D2/D3, the L298N on D5/D6/D9/D10, upload the sketch, and test each command on the floor before showing it to anyone. With the code in this guide, students in Pakistan can demonstrate a working system and explain every part of it — from the spoken word to the wheels — to their teachers and judges.