Top 5 Best Arduino Sensors | QKZee Technologies Lahore
Arduino has completely changed the way students and hobbyists build engineering projects. Whether you are working on IoT, DIY robotics or final year projects, sensors play a vital role — they help your Arduino interact with the physical world, making it intelligent and automated. This guide covers the five sensors every electronics student should know: the DHT11, HC-SR04, IR sensor module, LDR and MQ gas sensor — with the correct wiring, a complete working code example for each, and where to buy them in Pakistan.
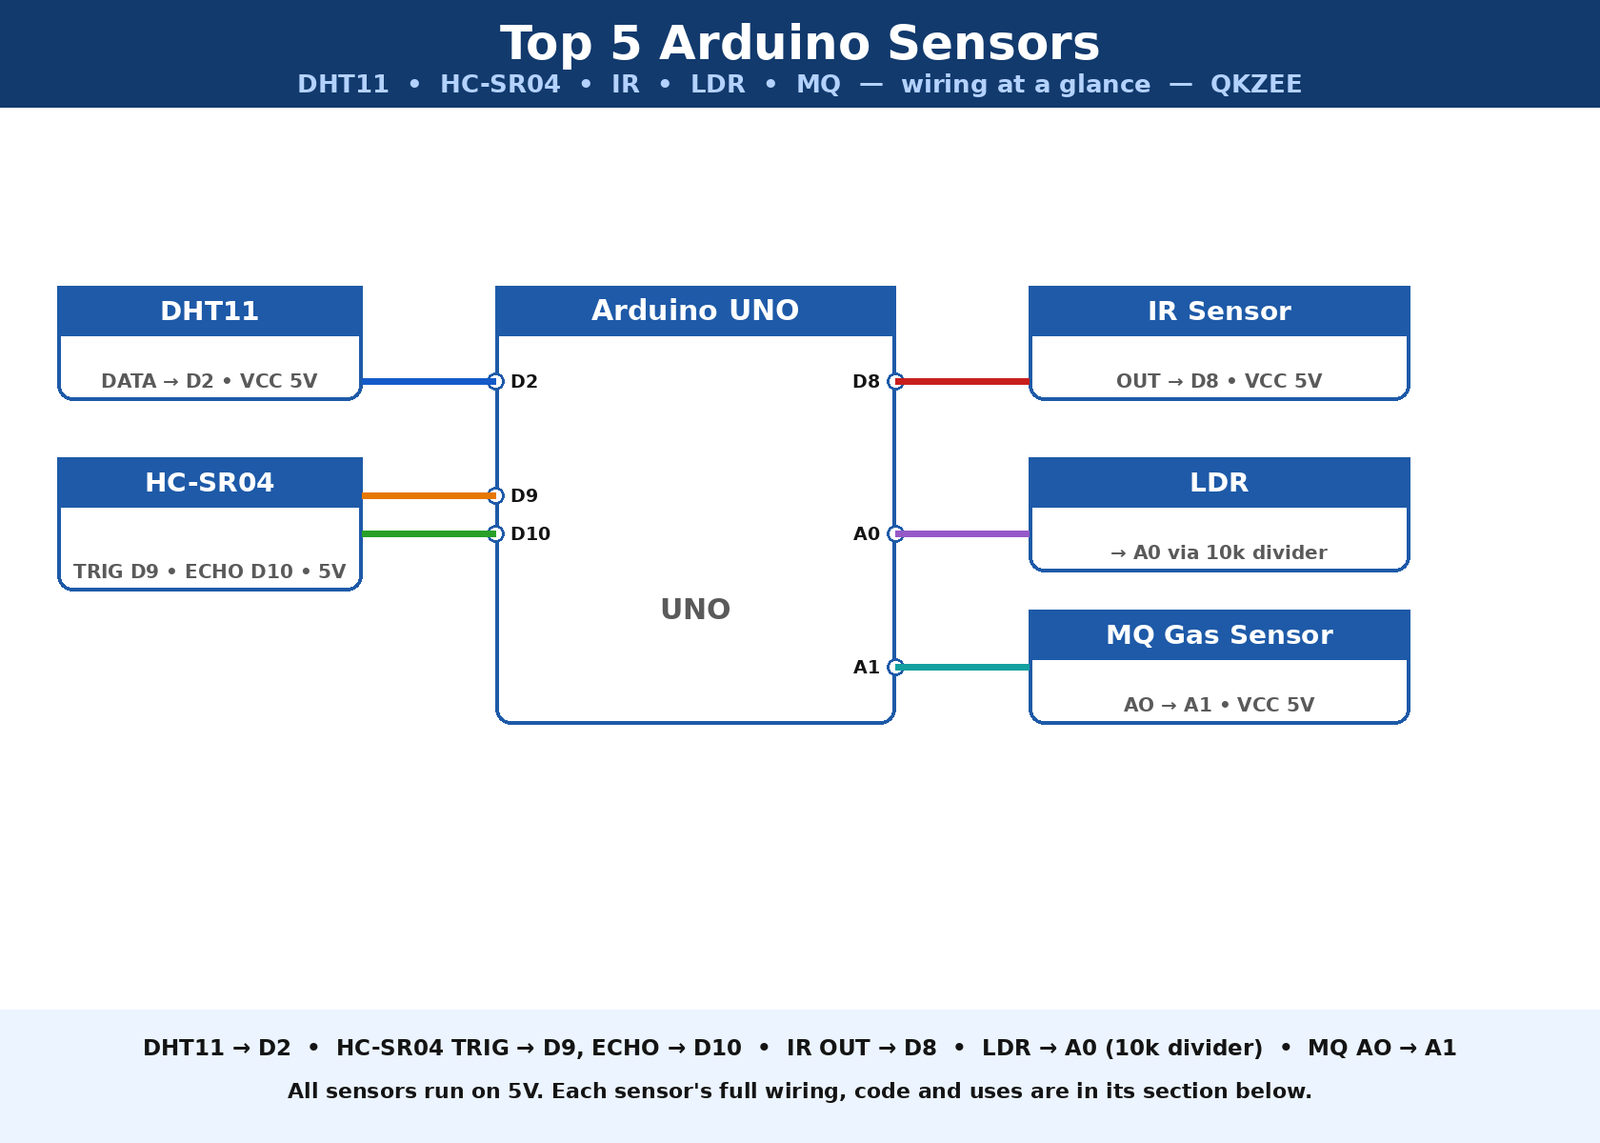
The Five Sensors at a Glance
| Sensor | Measures | Output | Arduino pin | Price |
|---|---|---|---|---|
| DHT11 | Temperature + humidity | Digital | D2 | Rs 215 |
| HC-SR04 | Distance | Digital (pulse) | Trig D9, Echo D10 | Rs 200 |
| IR sensor module | Object / obstacle | Digital | OUT → D8 | Rs 115 |
| LDR module | Light level | Analog | A0 | Rs 130 |
| MQ gas sensor | Gas / smoke | Analog | AO → A1 | No QKZEE listing — available at the Hall Road shop on request |
1. DHT11 Temperature and Humidity Sensor
The DHT11 sensor is one of the most popular choices for Arduino projects. It measures both temperature and humidity, making it perfect for weather stations, greenhouse monitoring and home automation systems.
Working Principle
This sensor uses a thermistor and a capacitive humidity sensor to deliver digital output signals. It sends the data through a single digital pin to the Arduino board.
Circuit Diagram
| DHT11 pin | Arduino pin |
|---|---|
| VCC | 5V |
| GND | GND |
| DATA | D2 |
Arduino Code Example
#include "DHT.h"

#define DHTPIN 2
#define DHTTYPE DHT11

DHT dht(DHTPIN, DHTTYPE);

void setup() {
  Serial.begin(9600);
  dht.begin();
}

void loop() {
  float h = dht.readHumidity();
  float t = dht.readTemperature();
  Serial.print("Temp: ");
  Serial.print(t);
  Serial.print(" C, Humidity: ");
  Serial.println(h);
  delay(2000);
}
Install the DHT sensor library by Adafruit from the Library Manager first (Sketch → Include Library → Manage Libraries), or the sketch will not compile.
Applications
- Smart irrigation systems
- Room climate monitoring
- Industrial temperature control
We use the DHT11 in a full build in our Arduino temperature and humidity data logger guide.
2. Ultrasonic Sensor (HC-SR04)
The HC-SR04 ultrasonic sensor is a favourite among students for distance measurement. It is ideal for robotics, obstacle detection and IoT automation.
Working Principle
It emits ultrasonic waves and measures the time taken for the echo to return. Arduino then calculates the distance using the speed of sound (343 metres per second): distance = time × 0.034 / 2 (the / 2 is because the sound travels to the object and back).
Circuit Connections
| HC-SR04 pin | Arduino pin |
|---|---|
| VCC | 5V |
| GND | GND |
| Trig | D9 |
| Echo | D10 |
Example Code
#define TRIG 9
#define ECHO 10

long duration;
int distance;

void setup() {
  Serial.begin(9600);
  pinMode(TRIG, OUTPUT);
  pinMode(ECHO, INPUT);
}

void loop() {
  digitalWrite(TRIG, LOW);
  delayMicroseconds(2);
  digitalWrite(TRIG, HIGH);
  delayMicroseconds(10);
  digitalWrite(TRIG, LOW);

  duration = pulseIn(ECHO, HIGH);
  distance = duration * 0.034 / 2;

  Serial.print("Distance: ");
  Serial.println(distance);
  delay(1000);
}
Applications
- Arduino robots for obstacle avoidance
- Parking sensors
- Industrial distance monitoring
We use the HC-SR04 in our obstacle avoidance robot car guide — the same wiring and code, with motors added.
3. IR Sensor Module
Infrared (IR) sensors are used in automation projects and line-following robots. They detect the presence of objects or motion using infrared light reflection.
Working Principle
An IR transmitter emits light, which reflects off an object and is detected by the receiver. Arduino reads this as a digital input (HIGH or LOW). Most IR obstacle modules give LOW when they see an object.
Circuit Connection
| IR sensor pin | Arduino pin |
|---|---|
| VCC | 5V |
| GND | GND |
| OUT | D8 |
Example Code
const int irPin = 8;
const int ledPin = 13;

void setup() {
  pinMode(irPin, INPUT);
  pinMode(ledPin, OUTPUT);
  Serial.begin(9600);
}

void loop() {
  int detected = digitalRead(irPin);   // most IR modules give LOW when they see an object
  if (detected == LOW) {
    digitalWrite(ledPin, HIGH);
    Serial.println("Object detected");
  } else {
    digitalWrite(ledPin, LOW);
    Serial.println("No object");
  }
  delay(200);
}
Applications
- Line-following Arduino robots
- Object counter systems
- Security alarms
We use the IR sensor in our automatic tap water system — the sensor detects your hand and switches the pump on.
4. LDR (Light Dependent Resistor) Sensor
An LDR sensor measures light intensity, often used in automatic lighting or solar tracking systems. It is a simple yet powerful component for school or university projects.
Working Principle
The resistance of an LDR decreases when light intensity increases. Arduino reads the light level as an analog voltage through a voltage divider: the LDR and a 10kΩ resistor in series, with the middle point connected to A0. In bright light the LDR’s resistance is low, so the A0 reading is high; in darkness the resistance is high, so the reading is low.
Circuit Diagram
| Connection | Where it goes |
|---|---|
| LDR, one leg | 5V |
| LDR, other leg | A0 and one leg of the 10kΩ resistor |
| 10kΩ resistor, other leg | GND |
The old version of this post said “One end to 5V, other to A0. Common end to ground” — that contradicts the divider and leaves the wiring unclear. The table above is the correct voltage-divider wiring: 5V → LDR → junction (A0) → 10kΩ → GND.
The LDR module (Rs 130) has this divider built in — it has three pins (VCC, GND, OUT) and its OUT goes straight to A0. The table above is for a bare LDR, which needs the 10kΩ resistor.
Example Code
const int ldrPin = A0;
const int ledPin = 13;

void setup() {
  pinMode(ledPin, OUTPUT);
  Serial.begin(9600);
}

void loop() {
  int light = analogRead(ldrPin);
  Serial.println(light);
  if (light < 400) {          // dark — turn the LED on
    digitalWrite(ledPin, HIGH);
  } else {
    digitalWrite(ledPin, LOW);
  }
  delay(200);
}
Applications
- Automatic street light system
- Solar panel alignment
- Smart home automation
We use the LDR in our automatic night light switch guide — the same divider idea, with an LM358 comparator instead of the Arduino.
5. MQ Gas Sensor
The MQ gas sensor detects gases like CO, LPG or methane. It is commonly used in industrial projects, IoT safety systems and final year projects.
Working Principle
It uses a chemical-sensitive layer that changes resistance when exposed to specific gases. Arduino reads this change as an analog signal. The sensor needs about 20 seconds to warm up after power-on, and its reading is relative — it tells you gas is present, not an exact ppm value (that needs calibration against a known gas concentration).
Circuit Connection
| MQ sensor pin | Arduino pin |
|---|---|
| VCC | 5V |
| GND | GND |
| AO | A1 |
Example Code
const int mqPin = A1;
const int buzzerPin = 13;

void setup() {
  pinMode(buzzerPin, OUTPUT);
  Serial.begin(9600);
  delay(20000);   // let the sensor warm up (about 20 seconds)
}

void loop() {
  int gas = analogRead(mqPin);
  Serial.println(gas);
  if (gas > 300) {   // threshold — adjust it for your room
    digitalWrite(buzzerPin, HIGH);
  } else {
    digitalWrite(buzzerPin, LOW);
  }
  delay(500);
}
Applications
- Smoke and gas leakage detection
- Fire safety systems
- Environmental monitoring
Buying Guide – How to Choose the Best Arduino Sensors
When selecting a sensor module, check three things:
- What you need to measure. Temperature and humidity → DHT11. Distance → HC-SR04. An object in front of the robot → IR module. Light level → LDR. Gas or smoke → MQ.
- Digital or analog. Digital sensors (DHT11, HC-SR04, IR) give a clean HIGH/LOW or a ready number. Analog sensors (LDR, MQ) give a 0–1023 reading that you compare with a threshold.
- Module or bare part. Modules (like the LDR module and the IR module) have the extra parts built in and three simple pins. Bare parts (a bare LDR, a bare MQ sensor) are cheaper but need the extra resistor or warm-up circuit. For a first project, buy the module.
Always choose modules with documentation and test codes, and compare prices before buying.
Where to Buy the Sensors
The DHT11 (Rs 215), HC-SR04 (Rs 200), IR sensor module (Rs 115) and LDR module (Rs 130) are available at QKZEE Technologies, Shop 20, 1st Floor, Al-Khalil Center, Hall Road, Lahore, and online at qkzeetech.com with delivery all over Pakistan — see the links above. The MQ gas sensor is available at the Hall Road shop on request. The Arduino UNO R3 DIP (Rs 1,200) runs all five sensors.
Still Stuck?
If a sensor gives no reading, or the code does not compile, message us — tell us which sensor you are using and what the Serial Monitor shows, and we will help you find the fault.
FAQs
Which sensor should I use for my final year project?
Pick the sensor that matches what your project measures: DHT11 for weather or climate, HC-SR04 for distance or obstacle avoidance, IR for line following or object detection, LDR for light control, MQ for gas safety. A project that combines two sensors (for example HC-SR04 + IR in a robot) scores better than one sensor alone.
Why does my DHT11 give no reading?
Check the wiring (DATA → D2, VCC → 5V) and install the DHT sensor library by Adafruit — without it the sketch will not compile. The DHT11 is also slow: it only gives a new reading every 2 seconds, so do not read it faster than that.
Why does my HC-SR04 always show 0 or a fixed number?
Check Trig → D9 and Echo → D10 are not swapped, and that the sensor faces the object (it needs a clear path — soft cloth and angled surfaces reflect badly). The sensor works from about 2 cm to 400 cm.
Why does my IR sensor give LOW all the time?
Most IR modules give LOW when they see an object and HIGH when they do not — that is normal. If it stays LOW with nothing in front of it, turn the small potentiometer on the module to reduce its sensitivity, and keep it away from sunlight (sunlight is full of infrared).
Do I need the 10k resistor with the LDR module?
No — the LDR module has the divider built in. You only need the 10k resistor with a bare LDR.
Can the MQ sensor measure exact gas levels in ppm?
Not without calibration. The sketch above gives a relative number that rises when gas is present. For a real ppm value you must calibrate the sensor against a known gas concentration and say so in your project report.
Conclusion – Selecting the Right Sensor for Your Project
Choosing the right sensor can transform your Arduino projects from basic to brilliant. Whether it is automation, robotics or IoT, each sensor adds intelligence and functionality. Start with one sensor, get its code working on the Serial Monitor, then add the next — and buy from a shop that gives you the module with its documentation, so your project works the first time.