How to Make an Automatic Tap Water System with IR Sensor and Relay (No Arduino Needed)
What is an automatic tap water system?
An automatic tap water system turns the water pump on by itself when you put your hand near the tap — and turns it off when you take your hand away. No touching the tap, no Arduino, no code. Just a sensor, a relay, a pump and a battery. It is one of the best first projects for students in Pakistan: it is cheap, it uses only 5 components, it works without programming, and it is a popular final-year project idea for schools and colleges.
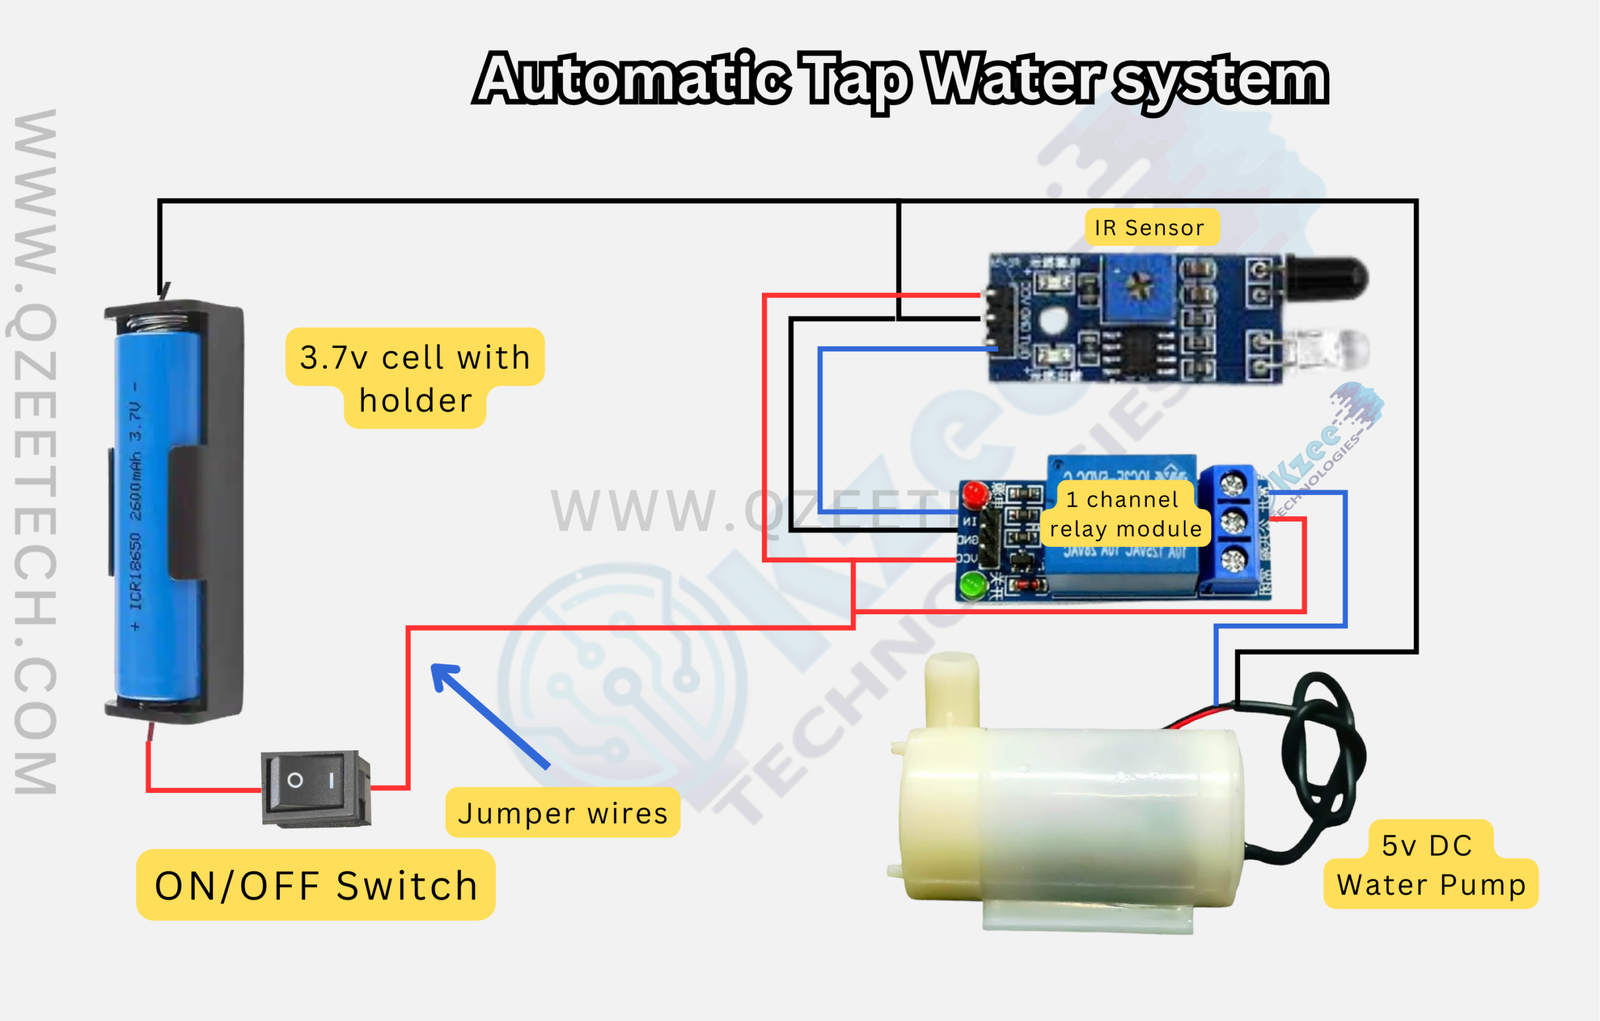
How it works
- The IR sensor continuously sends out invisible infrared light and watches for a reflection.
- When you put your hand in front of it, the reflected light hits the sensor and its OUT pin changes state.
- That signal goes to the IN pin of the relay module, which switches the relay on.
- The relay connects the battery power to the water pump, and the pump starts pushing water.
- When you take your hand away, the sensor signal stops, the relay switches off, and the pump stops.

Components you need
- IR Sensor Module — detects your hand
- 1-Channel Relay Module 5V — switches the pump on and off
- Mini 5V DC Water Pump (Submersible) — pushes the water
- Silicone Pipe for 5V DC Mini Water Pump — carries water from the pump to the tap
- 18650 Lithium-Ion Cell 3.7V — powers the whole system
- A single-cell 18650 battery holder
- An ON/OFF rocker switch
- 40-Pin Dupont Jumper Wires 30cm — for all connections
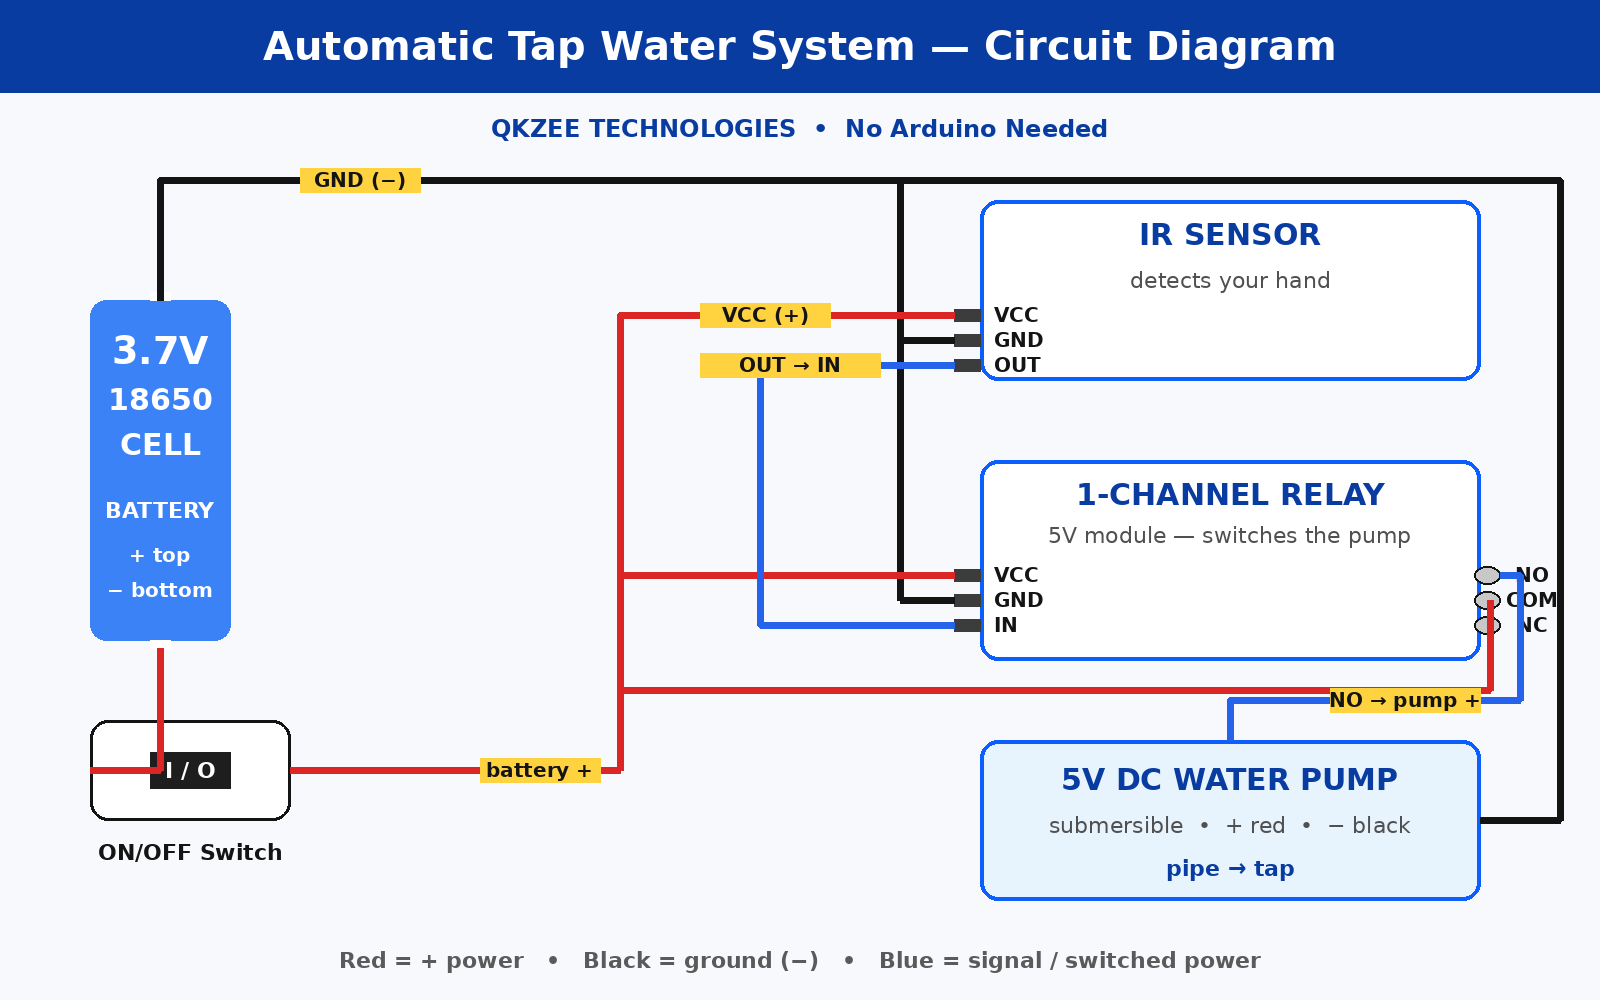
Circuit diagram
Connections (step by step)
Connect everything exactly as shown in the diagram above. There are only 7 connections:
| From | To | Wire colour |
|---|---|---|
| Battery + (3.7V) | ON/OFF Switch → Relay COM | Red |
| Battery + (3.7V) | IR Sensor VCC and Relay VCC | Red |
| Battery − (GND) | IR Sensor GND, Relay GND and Pump − | Black |
| IR Sensor OUT | Relay IN | Blue |
| Relay NO | Water Pump + | Blue |
| Water Pump − | Battery − | Black |
| ON/OFF Switch | Between battery + and relay COM | Red |
How to read the relay terminals: the 1-channel relay module has a 3-screw terminal block marked NO (Normally Open), COM (Common) and NC (Normally Closed). The pump wire goes to NO — the terminal that only connects to COM when the relay is switched on. The battery + wire (through the switch) goes to COM.
Important — power to the modules: the sensor and relay modules both need power on their VCC pins. The red + wire from the battery (through the switch) feeds the relay COM and the VCC pins of both modules; the black − wire feeds all the GND pins. If the sensor’s power LED does not light up, check the VCC and GND wires first — this is the most common mistake in this project.
Step-by-step build
Step 1: Connect the power
Connect the 18650 cell in its holder. The + wire (red) goes to one side of the ON/OFF switch; the − wire (black) goes to the GND rail (sensor GND, relay GND and pump −). Keep the switch OFF while you wire the rest.
Step 2: Connect the IR sensor
Connect the sensor’s three pins: VCC → red (+) wire, GND → black (−) wire, OUT → blue wire to the relay’s IN pin. The sensor’s onboard power LED should light up when you switch the system on.
Step 3: Connect the relay module
Connect the relay’s VCC → red (+), GND → black (−) and IN → blue (from the sensor OUT). Then connect the relay’s screw terminals: COM → red wire from the switch, NO → blue wire to the pump +.
Step 4: Connect the pump
Connect the pump’s + (red) wire to the relay NO terminal and the pump’s − (black) wire to battery −. Attach the silicone pipe to the pump outlet and place the pump in a water container.
Step 5: Test it
- Switch the system ON.
- Put your hand about 5–10 cm in front of the IR sensor. The relay should click, its LED should light up, and the pump should start.
- Take your hand away — the pump should stop within a second.
- If the pump does not start, or starts without a hand, adjust the sensor’s sensitivity (see below).
Adjusting the sensor sensitivity
The IR sensor module has a small blue potentiometer (the square with a cross screw on the module). Turn it slowly with a screwdriver:
- Pump runs without a hand: the sensor is too sensitive — turn the potentiometer a little in the other direction until it stops.
- Pump does not start when your hand is near: the sensor is not sensitive enough — turn the potentiometer the other way until it triggers at 5–10 cm.
- Sunlight or room lights trigger it: IR sensors react to strong sunlight. Test and use the system indoors, away from direct sunlight.
Troubleshooting
- Nothing lights up at all: the battery is dead or the switch is OFF. Check the battery voltage (a full 18650 reads about 4.2V, an empty one about 3.0V) and the switch wiring.
- Sensor LED is on but the relay never clicks: the OUT → IN wire is loose, or the sensor sensitivity is set too low. Check the blue wire and adjust the potentiometer.
- Relay clicks but the pump does not run: the pump wires are on the wrong relay terminals. The pump + must be on NO, not NC. Also check that the pump − wire goes to battery −.
- Pump runs all the time, even with no hand: the sensor is too sensitive, or it is facing a reflective surface or sunlight. Adjust the potentiometer and move the sensor away from shiny surfaces.
- Pump is weak or slow: the battery is low, or the pipe is blocked or kinked. Charge the 18650 cell and check the pipe.
Where can you use it?
- Home: a hands-free tap at the washbasin — no touching the tap with dirty hands.
- Schools and colleges: a hygiene project for classrooms and labs.
- Hospitals and clinics: touch-free water, where hygiene matters most.
- Final-year projects: add a water-level indicator or a second sensor and it becomes a complete FYP with a working demo.
Get your parts in Lahore
Everything in this project — IR sensor, relay module, mini water pump, silicone pipe, 18650 cell and jumper wires — is available at QKZEE Technologies, Shop #20, 1st Floor, AL-KHALIL Center, Hall Road, Lahore. You can also order online with Cash on Delivery across Pakistan, or ask on WhatsApp at +92-302-8577025.
- IR Sensor Module
- 1-Channel Relay Module 5V
- Mini 5V DC Water Pump (Submersible)
- Silicone Pipe for 5V DC Mini Water Pump
- 18650 Lithium-Ion Cell 3.7V
- 40-Pin Dupont Jumper Wires 30cm
Still stuck? We are here to help
If any step is unclear, message us on WhatsApp and we will guide you — or watch our YouTube channel for video guides and project tutorials.
FAQs
Does this project need an Arduino?
No. The IR sensor directly controls the relay module, and the relay switches the pump. There is no microcontroller and no code in this project.
Can I use a 5V adapter instead of the 18650 battery?
Yes. Any stable 5V DC supply (such as a mobile charger with a USB cable, cut and connected) can power the system. The 18650 cell makes it portable.
How far can the sensor detect my hand?
About 5–10 cm with the default setting. Turn the onboard potentiometer to increase or decrease the range.
Why does the pump keep running when I take my hand away?
The sensor is too sensitive, or it is seeing a reflection from a nearby surface or sunlight. Adjust the potentiometer and keep the sensor away from shiny objects and direct sunlight.
Can I use this for a school or FYP project?
Yes — it is a popular choice. Add a water tank level indicator, a second sensor, or a small display, and you have a complete project with a live demo.
What is the relay’s NO terminal?
NO means Normally Open — the terminal is disconnected from COM until the relay switches on. The pump must be wired to NO so that it only runs when the sensor detects a hand.