- +92-302-8577025
- qkzeetech@gmail.com
- shop 20, 1st floor Al-khalil Center Hall Road , Lahore
With rising electricity costs and frequent power outages in Pakistan, an increasing number of people are turning to DIY solar power systems. Whether you're an engineering student working on final year projects, a DIY enthusiast, or someone looking to reduce electricity bills at home, this project is practical, affordable, and future-proof.
At QKZee Technologies, Lahore, Pakistan, we've guided countless students in building solar energy projects. From Hall Road Lahore to top engineering universities, this project has become one of the best projects for both home automation and industrial automation applications.
In this detailed guide, we'll cover components, wiring, setup, advantages, Arduino monitoring, and real-life applications.
Solar energy reduces carbon footprint, making it one of the best green energy projects for students and homeowners.
Perfect for student projects, final year projects, and semester projects in engineering universities in Pakistan.
Electricity costs in Pakistan are rising. A DIY solar system ultimately saves money.
Can power small home appliances or scale up for industrial automation projects.
To build a DIY solar power system, you'll need the following:
All of these can be purchased from QKZee Technologies, Hall Road, Lahore, Pakistan, or from popular electronics markets.
Read this before wiring anything. A solar system stores real energy, and the battery is the dangerous part:
This setup is simple, practical, and effective for engineering projects.
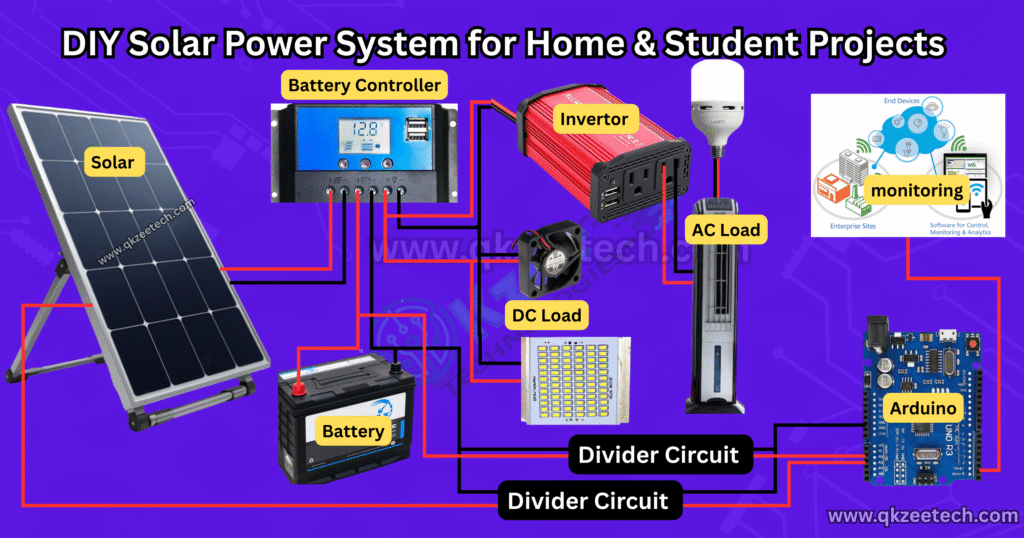
The old code in this post used the ESP8266 and the Blynk library — but it had two problems. First, it read analogRead(A1), and the ESP8266 has only one analog pin (A0) — there is no A1. Second, it used Blynk's legacy Blynk.begin(auth, ssid, pass) API, and Blynk's legacy cloud was shut down, so that sketch cannot work today.
This version runs on an ESP32, which has several ADC channels. It reads the solar panel voltage on GPIO 36 and the battery voltage on GPIO 39, each through a 100k/10k voltage divider (a 12V battery reads about 1.1V at the pin — safely inside the ESP32's 3.3V ADC range), and prints both to the Serial Monitor. Never connect 12V directly to an ESP32 pin — always use a divider.
// Solar + battery voltage monitor on ESP32
// Solar panel -> 100k/10k divider -> GPIO 36
// Battery     -> 100k/10k divider -> GPIO 39
// Divider ratio: 10k / (100k + 10k) = 0.0909
// So actual volts = pin volts / 0.0909 = pin volts * 11

const int solarPin = 36;
const int batteryPin = 39;
const float DIVIDER = 11.0;   // 100k/10k divider

void setup() {
  Serial.begin(115200);
}

void loop() {
  // Read the raw ADC values (0-4095) and convert to volts
  float solarVolts = analogRead(solarPin) * 3.3 / 4095.0 * DIVIDER;
  float batteryVolts = analogRead(batteryPin) * 3.3 / 4095.0 * DIVIDER;

  // Battery percentage (12V lead-acid: 11.0V empty, 12.7V full)
  int batteryPercent = (batteryVolts - 11.0) / (12.7 - 11.0) * 100;
  if (batteryPercent < 0) batteryPercent = 0;
  if (batteryPercent > 100) batteryPercent = 100;

  Serial.print("Solar: ");
  Serial.print(solarVolts);
  Serial.print(" V, Battery: ");
  Serial.print(batteryVolts);
  Serial.print(" V (");
  Serial.print(batteryPercent);
  Serial.println("%)");

  delay(2000);
}
This lets students and DIY hobbyists monitor their solar system live on the Serial Monitor. To see the same two numbers on your phone, send them to ThingSpeak — our ESP8266 IoT soil test station shows the full ThingSpeak pattern, and our wireless energy meter shows how to turn energy readings into a bill.
At QKZee Technologies Lahore, students are already creating IoT-based solar projects that combine Arduino, PLC, and industrial automation systems.
For best price and quality products for engineering services and electronics parts, head to:
A DIY solar power system is not just a project — it's a lifetime investment. It saves money, reduces dependence on the grid, and teaches valuable engineering and IoT skills.
From Hall Road Lahore to engineering universities in Pakistan, this project is becoming one of the best projects for students, DIY enthusiasts, and professional service providers.
With guidance from QKZee Technologies, building a solar system project is now easier than ever.
If your charge controller shows no charging, the inverter cuts out under load, or the ESP32 readings look wrong, message us on WhatsApp and we'll help you debug it — or watch the build on our YouTube channel.
Chat on WhatsApp Watch on YouTube
Q1: How big a solar panel do I need for a fan?
A normal 12V DC fan draws about 1–1.5A (12–18W). A 50W panel in good sun gives roughly 3A at 12V, so it runs the fan and still charges the battery. For a student demo, a 20–50W panel is enough. For a whole room (fan + lights), start at 100W with a 100Ah battery.
Q2: Can I skip the charge controller and connect the panel straight to the battery?
No — never. A panel in full sun puts out 18–21V open-circuit, which will overcharge and damage a 12V battery (and can boil a lead-acid battery dry). The charge controller is the one part you must not skip, even in a small demo.
Q3: How long will the battery run my load?
Divide the battery's watt-hours by your load's watts. A 12V 100Ah battery holds about 1,200Wh, but only use half of it (lead-acid should not go below 50%) — so about 600Wh usable. A 60W fan + lights setup runs about 10 hours on that. A 7Ah battery (84Wh, 42Wh usable) runs the same 60W load for about 40 minutes.
Q4: Can I run a fridge on a DIY solar system?
Not on a student-scale system. A fridge needs a large inverter (1,000W+), a big battery bank and several hundred watts of panels, and its compressor draws a large starting surge. This guide's scale is fans, lights, phone charging and small DC loads. A fridge is a full home solar installation, not a student project.
Q5: What does the ESP32 monitoring actually measure?
Two voltages: the solar panel voltage (which tells you whether the panel is producing) and the battery voltage (which tells you the charge level — about 11.0V is empty and 12.7V is full for a 12V lead-acid battery). It does NOT measure current or power — for that you need a current sensor like the ACS712, which you can add on the same ESP32.