
How to Burn Bootloader on ATmega328 with Arduino UNO (Arduino as ISP): Step-by-Step Guide
What is a bootloader?
A bootloader is a small program that sits on the microcontroller chip and manages the upload of your sketches onto it. A brand-new ATmega328 chip from the shop has no bootloader, so the Arduino IDE cannot upload code to it — you must burn the bootloader onto the chip first.
The easiest way to do this is with an Arduino UNO acting as an ISP (In-System Programmer): you program the UNO once with the ArduinoISP sketch, wire it to the bare chip, and burn the bootloader from the IDE. No separate programmer hardware is needed.
This guide uses Arduino IDE 2.x (the current version), matching our other guides. If you have not installed the IDE yet, follow our first guide: How to Download Arduino IDE: Step-by-Step Guide for Students in Pakistan.
Before you start: what you need
- An Arduino UNO board, for example the Arduino UNO R3 DIP with USB Cable
- A bare ATmega328P-PU chip (the DIP version that fits a breadboard) — ask us on WhatsApp if you need one
- A solderless breadboard, for example the MB102 Breadboard 830 Points
- Jumper wires, for example the 30cm 40-Pin Dupont Jumper Wire Ribbon Cable
- A data USB cable (not a charge-only cable)
- A computer (Windows, Mac or Linux) with Arduino IDE installed
To run the chip on its own after bootloading, you will also need a 16 MHz crystal, 2 × 22pF capacitors and a 10kΩ resistor (see the note in Step 4).
Step 1: Program your Arduino UNO as an ISP
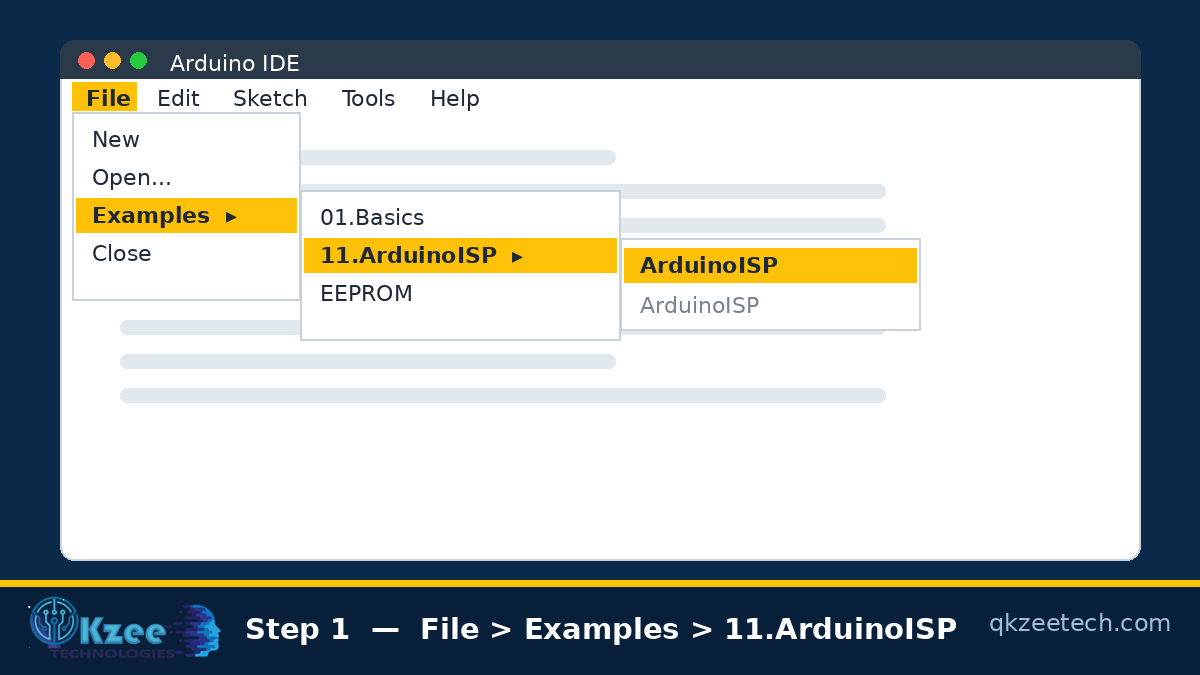
- Connect your Arduino UNO to the computer with the USB cable — do not connect anything else to it yet.
- In Arduino IDE, go to File > Examples > 11.ArduinoISP > ArduinoISP. The ArduinoISP sketch will open.
- Select your UNO board and port, exactly as in our guide: How to Upload Code in Arduino UNO.
- Click Upload. Once it finishes, your UNO is now an ISP programmer.
Note: Very old tutorials (from the Arduino IDE 1.0 days) tell you to change a delay(40) line to delay(20) in the ArduinoISP sketch. In the current IDE 2.x this change is not needed — skip it.
Step 2: Wire the UNO to the ATmega328
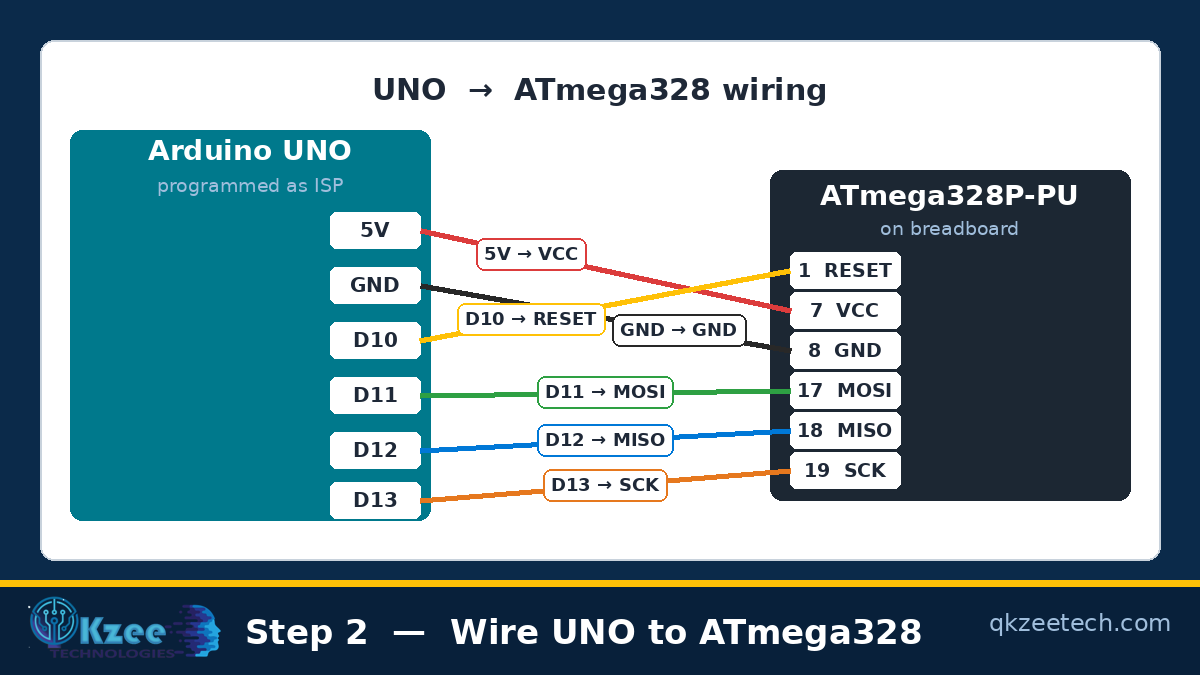
Connect the UNO to the ATmega328 chip on the breadboard with jumper wires, exactly as follows:
| UNO pin | → | ATmega328 pin | Signal |
|---|---|---|---|
| 5V | → | Pin 7 | VCC (power) |
| GND | → | Pin 8 | GND |
| D10 | → | Pin 1 | RESET |
| D11 | → | Pin 17 | MOSI |
| D12 | → | Pin 18 | MISO |
| D13 | → | Pin 19 | SCK |
Make sure nothing else is connected to the ATmega pins listed above. Double-check the wiring before moving on — most bootloader failures are wiring mistakes.
Step 3: Select the board, port and programmer
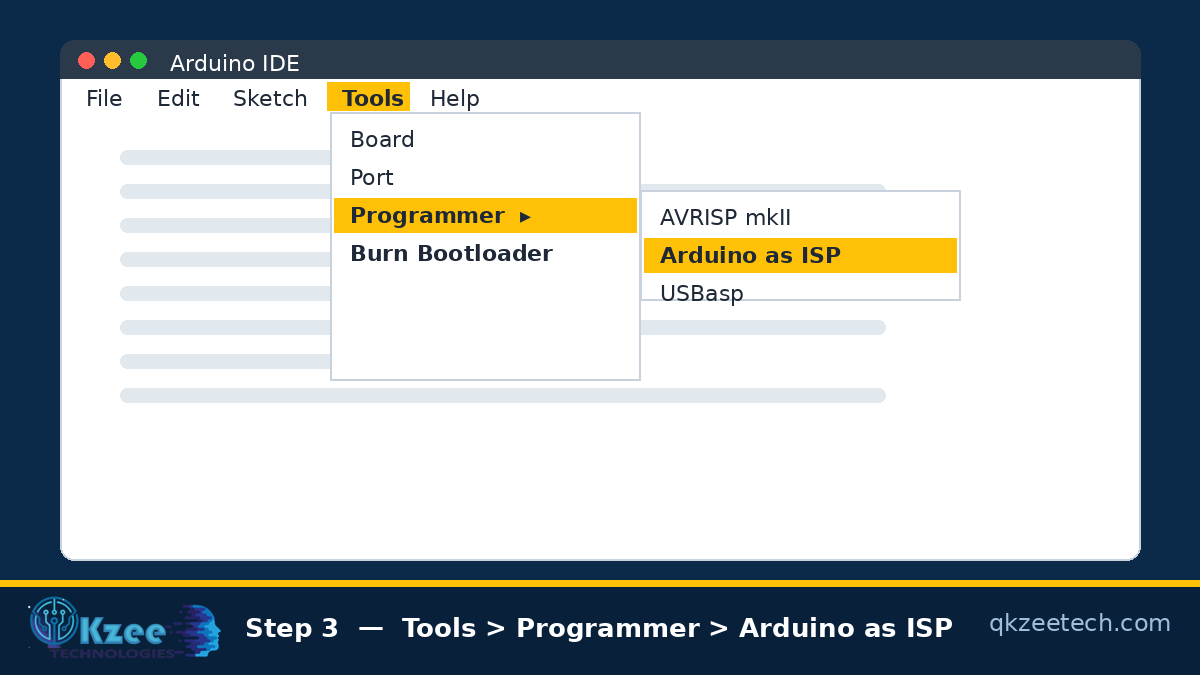
- In Arduino IDE, go to Tools > Board and select Arduino UNO.
- Go to Tools > Port and select the port your UNO is connected to.
- Go to Tools > Programmer and select Arduino as ISP.
Step 4: Burn the bootloader
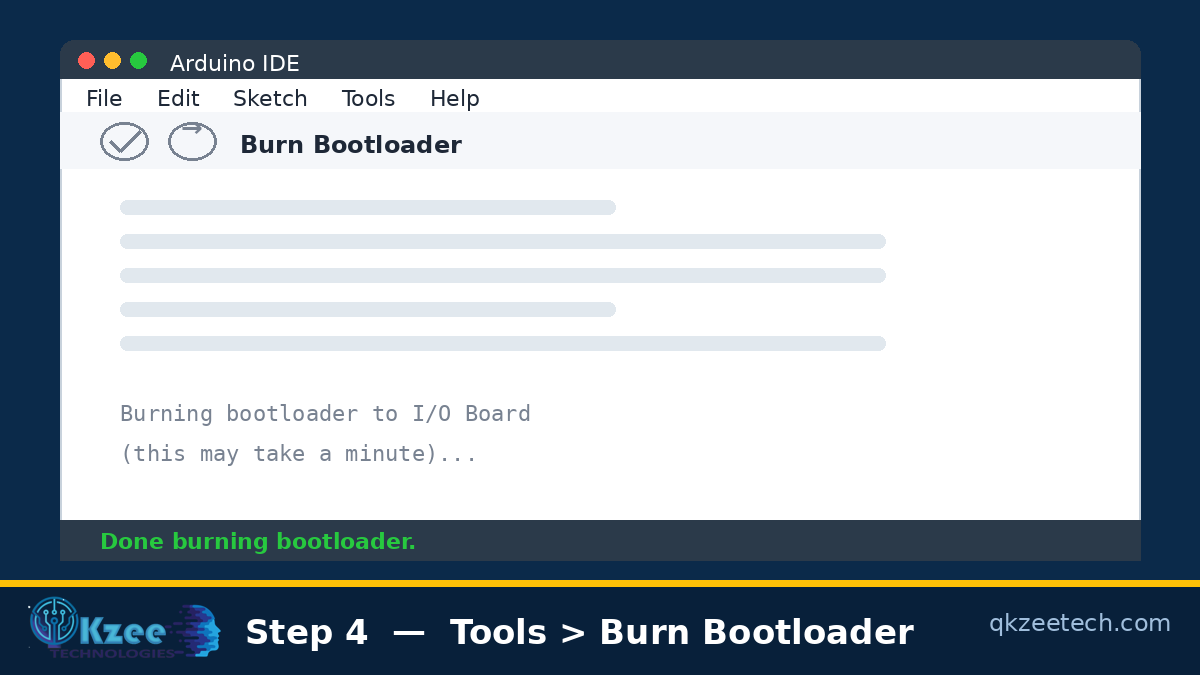
- In Arduino IDE, go to Tools > Burn Bootloader.
- You will see the message “Burning bootloader to I/O Board (this may take a minute)”. Wait — do not unplug anything.
- After about a minute, you will see “Done burning bootloader.” Your ATmega328 now has the Arduino UNO bootloader.
Important — the crystal: the UNO bootloader sets the chip to use a 16 MHz external crystal. So to run your chip on a breadboard afterwards, add a 16 MHz crystal between pins 9 and 10, a 22pF capacitor from each crystal pin to GND, and a 10kΩ resistor from pin 1 (RESET) to VCC. Without this circuit the chip will not run after bootloading. (Burning itself works without the crystal, because a new chip runs on its internal oscillator until the bootloader is burned.)
Step 5: Upload your first sketch
- Open the Blink example: File > Examples > 01.Basics > Blink.
- Go to Sketch > Upload Using Programmer (or press Ctrl + Shift + U).
- The sketch uploads through your UNO-as-ISP, and the LED on pin 19 of the chip (Arduino pin 13) will start blinking.
Note: a normal Upload will not work on the breadboard chip, because there is no USB-to-serial connection on the breadboard. Use Upload Using Programmer every time — or use an FTDI / USB-to-TTL adapter board connected to the chip’s TX/RX pins, which lets you upload normally.
ATmega328 vs ATmega328P — and the signature workaround
There are two chips that look identical:
- ATmega328P-PU — the “P” version with picoPower (low-power) technology. This is the chip used on Arduino boards, and the IDE supports it directly. If you have this chip, the steps above just work.
- ATmega328-PU (no “P”) — works the same way in practice, but it has a different device signature, and the IDE does not recognise it. If you try to burn the bootloader on this chip, you will see an error like: avrdude: Yikes! Invalid device signature or Expected signature for ATMEGA328P is 1E 95 0F (the 328P signature) while your chip reports 0x1e9514 (the 328 signature).
Workaround (only for the ATmega328-PU): trick the IDE into accepting your chip’s signature by editing the AVRDUDE configuration file:
- Make a backup copy of the file
avrdude.conffirst. - Find the file on Windows at:
C:\Users\<your name>\AppData\Local\Arduino15\packages\arduino\tools\avrdude\6.3.0-arduino17\etc\avrdude.conf(the version folder name, e.g.6.3.0-arduino17, may be different on your computer). - Open
avrdude.confin a text editor and search for0x1e 0x95 0x0F(the ATmega328P signature). - Replace it with
0x1e 0x95 0x14(the ATmega328 signature) and save the file. - Restart Arduino IDE and continue with the steps above.
- Once bootloading is complete, restore your backup copy of
avrdude.conf.
Troubleshooting
- “Yikes! Invalid device signature” — the IDE is talking to a different chip than the one selected. Check your wiring first, then check whether your chip is the ATmega328-PU (no “P”) — if so, use the signature workaround above.
- “avrdude: stk500_recv(): programmer is not responding” — the UNO was not programmed as an ISP, or the wrong port is selected. Re-do Step 1 and check the port.
- Burning fails immediately — check the 5V and GND wires, the RESET wire (UNO D10 → chip pin 1), and make sure nothing else is connected to the six pins used.
- Bootloader burned, but the chip does nothing — you need the 16 MHz crystal circuit (see the note in Step 4). Without the crystal, the chip cannot run after bootloading.
- Upload Using Programmer fails after a successful burn — press the reset button on the UNO once, check the wiring again, and try once more.
Get your parts in Lahore
Everything students need — Arduino UNO boards, breadboards, jumper wires, sensors and complete starter kits — is available at QKZEE Technologies, Shop #20, 1st Floor, AL-KHALIL Center, Hall Road, Lahore. You can also order online with Cash on Delivery across Pakistan, or ask on WhatsApp at +92-302-8577025.
- Arduino UNO R3 DIP with USB Cable
- MB102 Breadboard 830 Points
- 30cm 40-Pin Dupont Jumper Wire Ribbon Cable
Still stuck? We are here to help
If any step is unclear, message us on WhatsApp and we will guide you — or watch our YouTube channel for video guides and project tutorials.
FAQs
What is a bootloader?
A bootloader is a small program on the chip that lets the Arduino IDE upload sketches to it. A brand-new ATmega328 chip has no bootloader, so you must burn one onto it before you can upload any code.
Can I use an Arduino Nano as the ISP instead of an UNO?
Yes. Program the Nano with the same ArduinoISP sketch, select the Nano as your board when uploading it, and wire its D10–D13, 5V and GND pins to the chip exactly as in Step 2.
Do I need the 16 MHz crystal to burn the bootloader?
No — burning works without it, because a new chip runs on its internal oscillator. But after burning, the chip is set to use an external 16 MHz crystal, so you need the crystal, 2 × 22pF capacitors and a 10kΩ resistor before the chip will run on its own.
What is the difference between ATmega328P and ATmega328?
The 328P has picoPower low-power technology and is the chip Arduino boards use; the IDE supports it directly. The 328 (no “P”) works the same way but has a different device signature, so the IDE rejects it unless you use the avrdude.conf workaround in this guide.
How do I upload sketches to the chip after bootloading?
Use Sketch > Upload Using Programmer (Ctrl + Shift + U) with your UNO-as-ISP still connected. A normal Upload will not work, because the breadboard chip has no USB connection — unless you connect an FTDI / USB-to-TTL adapter to its TX/RX pins.
Will burning the bootloader erase my Arduino UNO?
No. The UNO keeps the ArduinoISP sketch and works as a programmer. Whenever you want to use the UNO as a normal board again, just upload any sketch to it as usual.