- +92-302-8577025
- qkzeetech@gmail.com
- shop 20, 1st floor Al-khalil Center Hall Road , Lahore
The HC-05 Bluetooth module is a widely used wireless communication device, perfect for Arduino projects, student projects, and industrial automation. This module is commonly used in engineering projects and automation systems due to its affordability and ease of use. Whether you’re working on school projects or final year projects, the HC-05 module can be an excellent addition to your setup.
The HC-05 is a Bluetooth module that allows wireless communication between microcontrollers and other Bluetooth-enabled devices. It operates on serial communication, making it easy to interface with Arduino and other microcontrollers. This module is often found in electronics markets like Hall Road, Pakistan, where you can purchase it from trusted sellers such as QKZee Technologies.
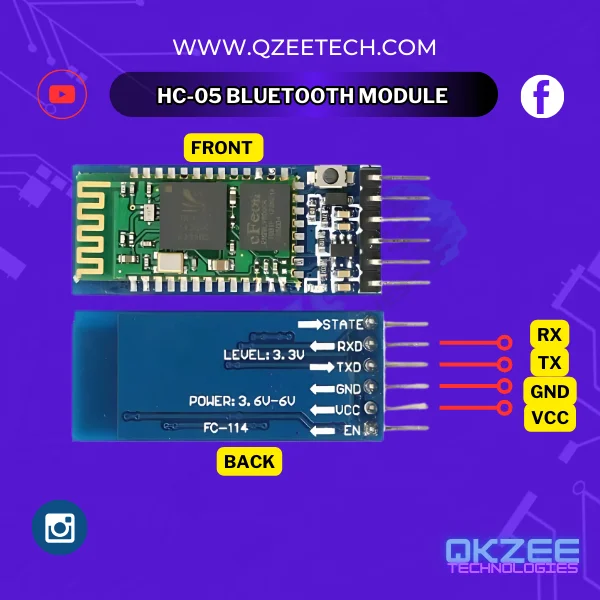
The HC-05 operates on Bluetooth 2.0 + EDR technology and supports both master and slave configurations. It uses UART (Universal Asynchronous Receiver-Transmitter) protocol to communicate with microcontrollers like Arduino. Due to its compatibility and reliability, it is widely used in automation and engineering projects.
Master vs slave: in slave mode the HC-05 waits for a phone or laptop to connect to it (the usual case — your phone controls the Arduino). In master mode the HC-05 connects out to another Bluetooth device (for example, one Arduino talking to another Arduino’s HC-05). Most student projects only need slave mode, which is the default.
| HC-05 Pin | Arduino Pin |
|---|---|
| VCC | 5V |
| GND | GND |
| TXD | RX (Pin 10) |
| RXD | TX (Pin 11) — through a 1k + 2k voltage divider |
| EN (Key) | Not required for basic setup |
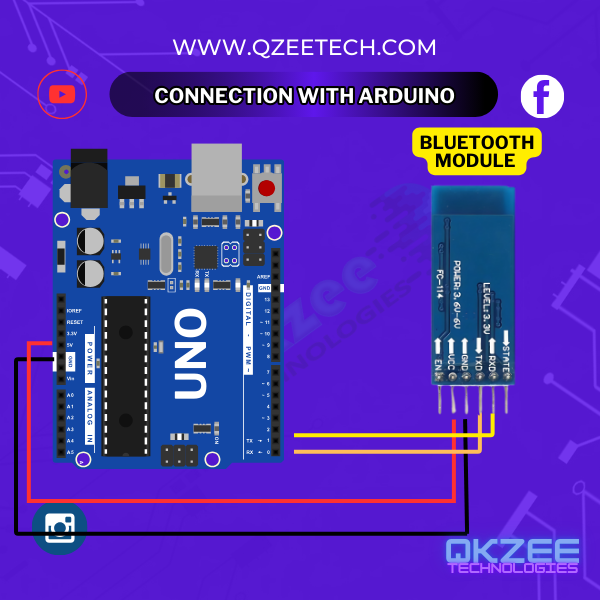
The 3.3V warning — read this before wiring: the HC-05’s RX pin is 3.3V logic. The Arduino’s TX pin puts out 5V. If you connect Arduino TX straight to HC-05 RX, you can damage the module. Put a 1k resistor in series and a 2k resistor to GND between Arduino pin 11 and the HC-05 RX pin — the junction of the two resistors goes to HC-05 RX, giving it about 3.3V. The other direction needs no divider: HC-05 TX (3.3V) → Arduino RX (pin 10) is safe, because the Arduino reads 3.3V as HIGH.
For the same divider in a full project, see our home automation guide.
C++
#include <SoftwareSerial.h>

SoftwareSerial BTSerial(10, 11);  // RX, TX

void setup() {
  Serial.begin(9600);
  BTSerial.begin(9600);
}

void loop() {
  if (BTSerial.available()) {
    Serial.write(BTSerial.read());
  }

  if (Serial.available()) {
    BTSerial.write(Serial.read());
  }
}
This is a pass-through sketch: anything your phone sends over Bluetooth appears on the Serial Monitor, and anything you type in the Serial Monitor is sent to your phone. It is the standard first test for an HC-05 — if this works, your wiring and pairing are correct, and you can build your real project on top of it. (The old code in this post was the same sketch, but its #include line had lost the library name and the block was labelled as JavaScript.)
To test it: pair your phone with the HC-05 (default PIN 1234 or 0000), open a Bluetooth terminal app, connect, and type. Your text should appear on the Serial Monitor, and text typed in the Serial Monitor should appear on your phone.
At QKZee Technologies, we are committed to providing the best services and consultation for your projects. Here’s why we’re the best place for your needs:
The HC-05 Bluetooth Module is a game-changer for student projects, engineering projects, and industrial automation. Whether in Lahore, exploring Hall Road, or anywhere in Pakistan, QKZee Technologies is here to help you succeed.
For more information or to get started on your next project, contact us today. Let’s bring your ideas to life!
The HC-05 module is available at Hall Road Lahore and online stores like QKZee Technologies. QKZee Technologies provides consultation and services for students and professionals working on engineering and industrial projects. Looking for affordable components for this Arduino project? Check out QKZee Technologies, an online shop in Lahore, Pakistan, offering the best components for students and DIY projects.
If your phone can’t find the HC-05, the pairing fails, or nothing appears on the Serial Monitor, message us on WhatsApp and we’ll help you debug it — or watch the build on our YouTube channel.
Chat on WhatsApp Watch on YouTube
Q1: What is the difference between the HC-05 and the HC-06?
The HC-05 can be both master and slave; the HC-06 is slave-only. If your phone controls the Arduino, either works — the HC-06 is simpler and cheaper. If one Arduino must connect to another Arduino’s Bluetooth module, you need the HC-05 (in master mode). The wiring and the code are the same for both. The HC-06 is on our shop for Rs 720; the HC-05 is available on order.
Q2: Why can’t my phone find the HC-05?
Check three things: (1) the HC-05’s LED is blinking fast (about twice a second) — that means it is waiting to pair; a slow blink means it is already connected to something else. (2) Your phone’s Bluetooth is on and you are searching from the Bluetooth settings, not from inside an app. (3) Nothing else is already connected to the module. If the LED is solid or blinking slowly, power-cycle the module.
Q3: Do I really need the voltage divider on the RX pin?
Yes. The HC-05’s RX pin is 3.3V logic and the Arduino’s TX pin is 5V. Many modules survive 5V for a while, but it stresses the pin and can damage it over time. A 1k + 2k divider costs almost nothing and makes the wiring correct. The HC-05 TX → Arduino RX direction needs no divider.
Q4: What are AT commands and do I need them?
AT commands let you change the module’s name, PIN and baud rate. To use them, hold the EN (Key) pin HIGH while powering the module — the LED blinks slowly and the module enters AT mode at 38400 baud. For a basic project you do not need AT commands at all: the default name (HC-05), PIN (1234 or 0000) and baud rate (9600) work as-is.
Q5: How far does the HC-05 reach?
About 10 metres in open air, less through walls. It is Bluetooth Classic (2.0), not Bluetooth Low Energy, so it is meant for short-range control — a robot in the same room, a home automation switch in the same house. For longer range, use an ESP32 with Wi-Fi instead.