- +92-302-8577025
- qkzeetech@gmail.com
- shop 20, 1st floor Al-khalil Center Hall Road , Lahore
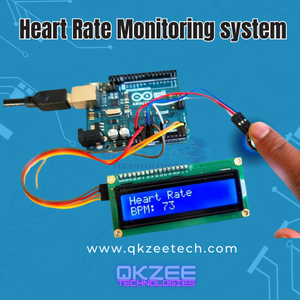
In this blog post, we'll delve into the exciting world of heart rate monitoring using Arduino. By combining the power of Arduino microcontrollers with a heart rate sensor, we can create a simple yet effective system to track our heartbeats.
Important — read this first: this is a student project, NOT a medical device. The readings are approximate — good enough to learn from, never good enough for diagnosis, treatment, or monitoring a real patient. If you or someone else feels unwell, see a doctor, not this circuit.
To build this system, you'll need the following components:
The pulse sensor shines a green LED into your fingertip and measures how much light bounces back. Blood absorbs green light, so with every heartbeat — when a pulse of blood reaches your fingertip — the reflected light dips. The sensor turns that dip into a small analogue voltage, and the Arduino reads it on A0. The PulseSensorPlayground library watches that signal, finds the peaks, and calculates beats per minute (BPM).
| Pulse Sensor Pin | Arduino Pin |
|---|---|
| VCC (red wire) | 5V |
| GND (black wire) | GND |
| Signal (purple wire) | A0 |
The LED (optional) goes from D13 through a 220Ω resistor to GND — or use the Arduino's built-in LED on D13, which the sketch below already blinks on each beat.
#include <PulseSensorPlayground.h>

const int PULSE_INPUT = A0;
const int LED_PIN = 13;  // built-in LED blinks on each beat

PulseSensorPlayground pulseSensor;

void setup() {
  Serial.begin(9600);

  pulseSensor.analogInput(PULSE_INPUT);
  pulseSensor.blinkOnPulse(LED_PIN);
  pulseSensor.setThreshold(550);

  if (pulseSensor.begin()) {
    Serial.println("Pulse sensor ready — place your fingertip on the sensor");
  }
}

void loop() {
  int heartRate = pulseSensor.getBeatsPerMinute();

  if (pulseSensor.sawStartOfBeat()) {
    Serial.print("Heart Rate: ");
    Serial.print(heartRate);
    Serial.println(" BPM");
  }

  delay(20);
}
What the sketch does: analogInput(A0) tells the library which pin the sensor is on; setThreshold(550) sets the signal level that counts as a beat (adjust it up or down if beats are missed — see FAQ Q2); sawStartOfBeat() is true once per heartbeat, so the BPM prints once per beat instead of flooding the Serial Monitor. The old code in this post called pulseSensor.begin() without ever setting the pin or the threshold, had no Serial.begin(), and ended with a stray line of JavaScript pasted inside the Arduino code — none of that is in this version.
By following these steps and leveraging the capabilities of Arduino, you can create a functional heart rate monitoring system. This project is a great starting point for exploring the world of wearable technology and healthcare applications. Remember: it is a learning project, not a medical device — the numbers it gives are approximate.
If the BPM jumps around, reads 0, or the LED never blinks, message us on WhatsApp and we'll help you debug it — or watch the build on our YouTube channel.
Chat on WhatsAppWatch on YouTube
Q1: Why does the BPM jump around so much?
Because the signal is small and noisy. Hold your finger still, press lightly (not hard), shield the sensor from bright light, and let it settle for 10–15 seconds before trusting the number. Taking an average of the last 5–10 readings smooths it out a lot. Movement is the biggest cause of jumping readings.
Q2: Why does it read 0 BPM?
Either the sensor isn't seeing a pulse or the threshold is wrong. Check the wiring first (Signal → A0, VCC → 5V, GND → GND). Then try lowering the threshold from 550 to 500 — if the signal is weak, the library never sees a beat. Also check that your fingertip fully covers the sensor's green LED and light detector.
Q3: What's the difference between the pulse sensor and the MAX30102?
The pulse sensor is a simple photoplethysmography (PPG) sensor — it gives one analogue signal and the library derives BPM from it. The MAX30102 is a proper optical sensor with red and infrared LEDs that measures both heart rate and blood oxygen (SpO2) with much cleaner data. For a first project, the pulse sensor is simpler; for a serious health project, see our MAX30102 guide.
Q4: Can this detect a heart attack or an irregular heartbeat?
No. This project counts beats — it cannot diagnose anything. It has no ECG, no medical certification, and its readings are approximate. Never use it (or any Arduino project) to judge someone's health. If you feel unwell, see a doctor.
Q5: Why doesn't the LED blink?
The LED blinks only when the library detects the start of a beat (sawStartOfBeat()). If it never blinks, the library isn't detecting beats — same causes as Q2: wiring, threshold, or finger placement. If you wired a separate LED to D13, check the resistor (220Ω) and that the LED's long leg goes toward D13 and the short leg toward GND.
