- +92-302-8577025
- qkzeetech@gmail.com
- shop 20, 1st floor Al-khalil Center Hall Road , Lahore
Are you looking to add wireless capabilities to your Arduino projects? The HC-06 Bluetooth module might be just what you need. This module is a popular choice for hobbyists and professionals alike, offering an easy way to enable Bluetooth communication in a variety of projects. From student projects to final year projects in engineering, the HC-06 is versatile and reliable. In this article, we'll dive deep into the HC-06, covering its description, pin configuration, uses, features, and more. Ready to get started? Let's go!
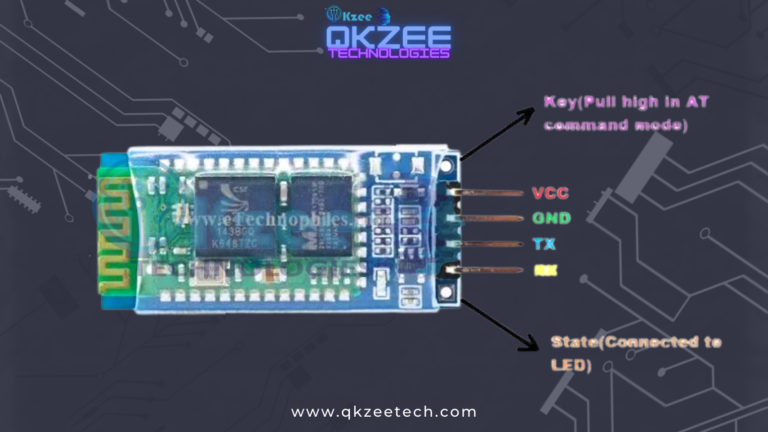
The HC-06 Bluetooth module is a simple, cost-effective solution for adding Bluetooth functionality to microcontroller projects, particularly with Arduino. It is a slave-only device designed for short-range wireless communication. It's widely used due to its ease of integration, affordability, and reliable performance. This module facilitates serial communication between devices, making it perfect for projects where you want to wirelessly transfer data without complicated wiring.
Slave-only means: the HC-06 waits for a phone or laptop to connect to it — it can never connect out to another device itself. For phone-controls-Arduino projects (the usual case) that is all you need. If one Arduino must connect to another Arduino's Bluetooth module, you need the HC-05 in master mode instead — see our HC-05 guide.
The module uses UART (Universal Asynchronous Receiver/Transmitter) protocol for communication. It supports baud rates from 1200 to 1382400, although the default baud rate is 9600.
The HC-06 typically has a range of up to 10 meters in open space. Its data transfer rates can reach up to 2.1 Mbps, which is sufficient for most hobbyist applications.
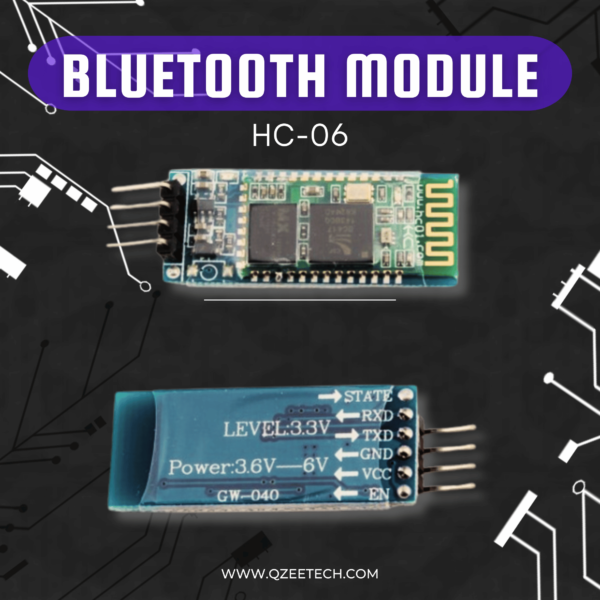
The HC-06 has five pins:
| HC-06 Pin | Arduino Pin |
|---|---|
| VCC | 5V |
| GND | GND |
| TXD | RX (Pin 10) |
| RXD | TX (Pin 11) — through a 1k + 2k voltage divider |
| EN | Not required for basic setup |
The 3.3V warning — read this before wiring: the HC-06's RX pin is 3.3V logic. The Arduino's TX pin puts out 5V. If you connect Arduino TX straight to HC-06 RX, you can damage the module. Put a 1k resistor in series and a 2k resistor to GND between Arduino pin 11 and the HC-06 RX pin — the junction of the two resistors goes to HC-06 RX, giving it about 3.3V. The other direction needs no divider: HC-06 TX (3.3V) → Arduino RX (pin 10) is safe, because the Arduino reads 3.3V as HIGH.
#include <SoftwareSerial.h>

SoftwareSerial BTSerial(10, 11);  // RX, TX

void setup() {
  Serial.begin(9600);
  BTSerial.begin(9600);
}

void loop() {
  if (BTSerial.available()) {
    Serial.write(BTSerial.read());
  }
  if (Serial.available()) {
    BTSerial.write(Serial.read());
  }
}
This is a pass-through sketch: anything your phone sends over Bluetooth appears on the Serial Monitor, and anything you type in the Serial Monitor is sent to your phone. It is the standard first test for an HC-06 — if this works, your wiring and pairing are correct, and you can build your real project on top of it. (The old version of this post had the same sketch, but it sat inside a hidden widget and never rendered on the page — and its #include line had lost the library name.)
To test it: pair your phone with the HC-06 (default PIN 1234 or 0000), open a Bluetooth terminal app, connect, and type. Your text should appear on the Serial Monitor, and text typed in the Serial Monitor should appear on your phone.
AT commands are used to configure the HC-06 module. They allow you to set parameters like the module's name, baud rate, and password. AT commands only work while the module is NOT paired — the LED must be blinking fast. Once a phone connects, the module stops listening for AT commands and passes everything through as data.
\r\n after its commands.AT+NAMEQKZEE — the module replies OKsetname. The name follows AT+NAME directly, with no space.AT+PIN1234 — the module replies OKsetPIN. The PIN must be exactly 4 digits.You can change the baud rate using the command AT+BAUDx, where x is a number:
| Code | Baud rate |
|---|---|
| 1 | 1200 |
| 2 | 2400 |
| 3 | 4800 |
| 4 | 9600 (default) |
| 5 | 19200 |
| 6 | 38400 |
| 7 | 57600 |
| 8 | 115200 |
For example, AT+BAUD8 sets 115200 baud. After changing the baud rate, you must change BTSerial.begin(...) in your sketch to match — otherwise the Arduino and the module talk at different speeds and you get garbage characters.
The HC-06 is perfect for projects that require wireless communication, such as sending sensor data to a remote device.
Use the HC-06 to control lights, thermostats, and other home appliances from your smartphone or computer — see our home automation guide.
Build remote control systems for robots, cars, or drones using the HC-06, allowing you to easily control them wirelessly — see our voice-controlled robot.
The HC-06 is an excellent choice for student projects due to its simplicity and wide support, making it easy to implement in various educational projects.
The HC-06 can be a key component for engineering students in final-year projects, providing wireless communication capabilities that add sophistication and functionality.
The HC-06 is affordable, widely supported, and has ample documentation and community support, making it an ideal choice for both beginners and experienced developers.
Ensure that the module is powered correctly and that the connections are secure. Double-check the baud rates on both the HC-06 and the Arduino — a mismatch gives garbage characters, not silence.
Verify that the TX and RX pins are correctly connected and not swapped. Also, check for any interference from other electronic devices. If you see garbage characters, the baud rate is wrong; if you see nothing at all, the wiring is wrong.
If the module is not responding to AT commands, ensure it is in AT command mode (unpaired, fast-blinking LED) and that the baud rate is set correctly — and that the Serial Monitor's line ending is set to "No line ending".
Position the module away from metal objects and other sources of interference to improve signal strength and reliability.
Use shielded cables and avoid placing the module near other electronic devices that can cause interference.
Always change the default password to prevent unauthorized access. Use secure passwords to enhance security.
Bluetooth Classic (2.0) has no real encryption for hobby use — do not send sensitive data over it, and do not use it to control anything dangerous (a lock, a heater, a machine) without a second layer of safety.
The HC-05 can function as both a master and a slave device, while the HC-06 is a slave-only module. This makes the HC-06 simpler but less flexible compared to the HC-05. The wiring and the pass-through code are identical for both. The HC-05 is available on order — message us on WhatsApp; the HC-06 is on the shop for Rs 720. See our HC-05 guide for the full comparison.
Other alternatives include the HM-10 for BLE (Bluetooth Low Energy) applications and the RN-42 for more advanced features. Neither is currently on the QKZEE shop — both are available on order.
Use external antennas or repeaters to extend the range of your HC-06 module. (In practice, the HC-06's on-board antenna gives about 10 metres — for longer range, use an ESP32 with Wi-Fi instead.)
For advanced users, customizing the firmware can unlock additional features and optimize performance for specific applications. This is rarely worth it for a student project — the stock firmware does everything the guides in this post need.
The HC-06 Bluetooth module is a versatile and reliable component for adding wireless communication to your Arduino projects. Its ease of use, affordability, and robust performance make it a favorite among hobbyists and professionals alike. Whether you're working on home automation, remote control systems, or simple data transmission, the HC-06 is an excellent choice. Plus, if you're in Lahore or shopping at Hall Road, you'll find it to be one of Pakistan's best solutions for Bluetooth communication.
If your phone can't find the HC-06, the pairing fails, AT commands get no reply, or nothing appears on the Serial Monitor, message us on WhatsApp and we'll help you debug it — or watch the build on our YouTube channel.
Chat on WhatsAppWatch on YouTube
Q1: What is the difference between the HC-05 and the HC-06?
The HC-05 can be both master and slave; the HC-06 is slave-only. If your phone controls the Arduino, either works — the HC-06 is simpler and cheaper (Rs 720 on our shop). If one Arduino must connect to another Arduino's Bluetooth module, you need the HC-05 in master mode. The wiring and the pass-through code are identical for both.
Q2: Why can't my phone find the HC-06?
Check three things: (1) the HC-06's LED is blinking fast (about twice a second) — that means it is waiting to pair; a slow blink means it is already connected to something else. (2) Your phone's Bluetooth is on and you are searching from the Bluetooth settings, not from inside an app. (3) Nothing else is already connected to the module. If the LED is solid or blinking slowly, power-cycle the module.
Q3: Do I really need the voltage divider on the RX pin?
Yes. The HC-06's RX pin is 3.3V logic and the Arduino's TX pin is 5V. Many modules survive 5V for a while, but it stresses the pin and can damage it over time. A 1k + 2k divider costs almost nothing and makes the wiring correct. The HC-06 TX → Arduino RX direction needs no divider.
Q4: Why don't my AT commands get a reply?
Three usual causes: (1) the module is already paired — AT commands only work while unpaired (fast-blinking LED); disconnect the phone first. (2) The Serial Monitor's line ending is not "No line ending" — the HC-06 wants the command with no \r\n after it. (3) The baud rate is wrong — AT mode runs at the module's configured baud rate (default 9600); if you changed it with AT+BAUDx, use the new rate.
Q5: Can two Arduinos talk to each other over Bluetooth?
Not with two HC-06s — both are slave-only, so neither can initiate a connection. You need one HC-05 in master mode (it connects out) and one HC-06 or HC-05 in slave mode (it waits). Pair them once with AT commands (AT+BIND on the master, using the slave's address), and after that they connect automatically on power-up.