- +92-302-8577025
- qkzeetech@gmail.com
- shop 20, 1st floor Al-khalil Center Hall Road , Lahore
Imagine you could "see" a wall or car using sound. Ultrasonic sensors do exactly that. In this Arduino ultrasonic sensor project, the HC-SR04 sends out high-frequency sound pulses and measures how long they take to bounce back. We then convert that into distance. This makes it a perfect topic for student projects, final year projects, and electronics engineering learning in Lahore, Pakistan.
Ultrasonic sensors find echoes of their own sound. The time difference between sending and receiving gives the distance. Because sound travels at a known speed, it's a reliable method for distance measurement.
For the full background on how ultrasonic sensors work — including how they compare with PIR motion sensors — see our comprehensive guide to ultrasonic sensors.
To build this distance measurement Arduino device, you will need:
Total for the basic build: Rs 1,830. In Lahore especially near Hall Road, the local electronics market is full of these parts. Shops such as QKZee Technologies often assist students with best engineering services at fair prices. Many students from universities come searching for "projects near me" in that area.
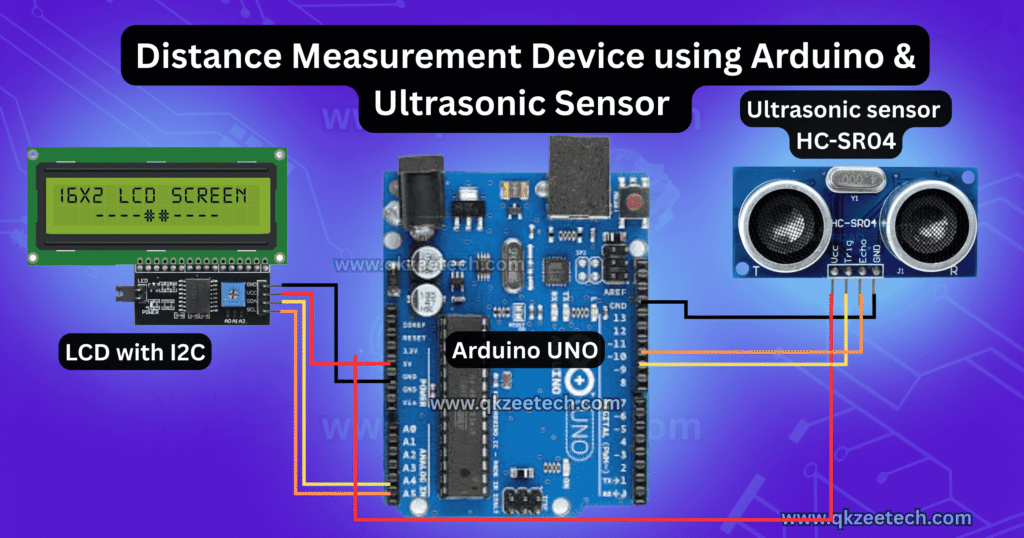
Here's how to wire the HC-SR04 with the Arduino Uno carefully:
| HC-SR04 Pin | Arduino Pin |
|---|---|
| VCC | 5V |
| GND | GND |
| TRIG | Digital Pin 9 |
| ECHO | Digital Pin 10 |
This wired setup ensures the HC-SR04 triggers a pulse and listens for its reflection. Mistakes in wiring often cause no reading or erratic distances.
Once the circuit is ready, it's time for the software side. Here's a sample sketch (program):
const int trigPin = 9;
const int echoPin = 10;

long duration;
int distance;

void setup() {
  Serial.begin(9600);
  pinMode(trigPin, OUTPUT);
  pinMode(echoPin, INPUT);
}

void loop() {
  digitalWrite(trigPin, LOW);
  delayMicroseconds(2);
  digitalWrite(trigPin, HIGH);
  delayMicroseconds(10);
  digitalWrite(trigPin, LOW);

  duration = pulseIn(echoPin, HIGH);

  distance = duration * 0.034 / 2;

  Serial.print("Distance: ");
  Serial.print(distance);
  Serial.println(" cm");
  delay(500);
}pulseIn(echoPin, HIGH) returns the time in microseconds for the echo to return.This code is a foundation you can alter for IoT projects, Arduino sensor projects, or more complex systems.
After uploading the sketch, open the Serial Monitor in the Arduino IDE. You'll begin seeing distance values in centimeters.
Move an object closer or further to test accuracy. If readings wobble:
Accurate calibration is especially crucial in automation, robotics, or safety-critical systems.
This distance measurement Arduino project is highly versatile. Some real-world applications:
You might even integrate Raspberry Pi projects or image processing to build advanced robotics or CNC automation systems.
If you're searching "student project in Lahore" or "best shop for student projects in Lahore Pakistan," QKZee Technologies Hall Road is your stop. This electronics market is famed for plentiful electronics parts.
QKZee Technologies is well known for offering consultation for final year projects in Lahore. Students often get full kits and support from them. The best price for student projects often comes from these trusted places.
The basic build costs Rs 1,830 at QKZee (UNO Rs 1,200 + HC-SR04 Rs 200 + breadboard Rs 250 + jumper wires Rs 180). More complex automation or IoT-based systems (with ESP8266, Raspberry Pi, etc.) push the price upward, depending on parts and software support.
Building a Distance Measurement Device Using Arduino and Ultrasonic Sensor teaches you how sensors interface with microcontrollers, how to write and troubleshoot code, and how real-world physical systems behave. This project bridges theory and practice. It sets a strong foundation for advanced engineering projects, IoT solutions, automation, and robotics. In Lahore, many students turn to QKZee Technologies for support with their final year projects. Whether you're doing a school project, university project, or a full FYP in Pakistan, this Arduino project is a standout option that's both educational and practical.
If your readings show 0 cm, jump around, or never change, message us on WhatsApp and we'll help you debug it — or watch the build on our YouTube channel.
Chat on WhatsApp → Watch on YouTube →
Q1: How far can the HC-SR04 measure?
Reliably from about 2 cm to 400 cm (4 metres). Closer than 2 cm the echo returns before the sensor is ready to listen, so it reads 0. Beyond 4 metres the echo is too weak to detect. For a student project, 2–200 cm is the sweet spot.
Q2: Why does my serial monitor show 0 cm all the time?
Usually the wiring: check that TRIG is on D9 and ECHO is on D10 (not swapped), and that VCC is 5V, not 3.3V. If the wiring is right, check that nothing is closer than 2 cm to the sensor — the sensor cannot measure its own face.
Q3: Does the HC-SR04 work outdoors?
Poorly. Wind, rain and soft surfaces (cloth, foam, grass) scatter or absorb the sound, so the echo never comes back. It works best indoors on hard, flat surfaces like walls and cardboard. For outdoor distance sensing, a laser (ToF) sensor works better.
Q4: Why do my readings jump around?
The sensor picks up stray echoes from nearby objects, and the reading changes with temperature (sound travels faster in warm air). Fix it by taking 5 readings and using the median, and by adding a short delay between readings. A flat wall straight ahead gives the steadiest reading — an angled surface scatters the echo.
Q5: HC-SR04 or an IR sensor — which should I use?
The HC-SR04 measures actual distance (2–400 cm) and works in the dark. An IR obstacle sensor only tells you whether something is within a few centimetres — it cannot measure distance. Use the HC-SR04 when you need a number; use the IR sensor when you only need a yes/no (like a line follower). See our ultrasonic sensors guide linked above for the full comparison.