- +92-302-8577025
- qkzeetech@gmail.com
- shop 20, 1st floor Al-khalil Center Hall Road , Lahore
If you're planning to build a robot, you'll need to control various motors like DC motors, stepper motors, or servos, and the L293D Motor Driver Shield is the best option for this task. This shield is not only capable of handling these motor types but also eliminates the need for additional modules. The brains of this shield are its two L293D motor drivers and a 74HC595 shift register, which work together seamlessly.
The L293D is a dual-channel H-Bridge motor driver, meaning it can control up to four DC motors or two stepper motors. The 74HC595 shift register, on the other hand, extends the Arduino's digital pins by converting its four pins into eight direction control pins, making it easy to manage multiple motors. With these features, the L293D Shield ensures precision and efficiency for both simple and complex robotic designs.
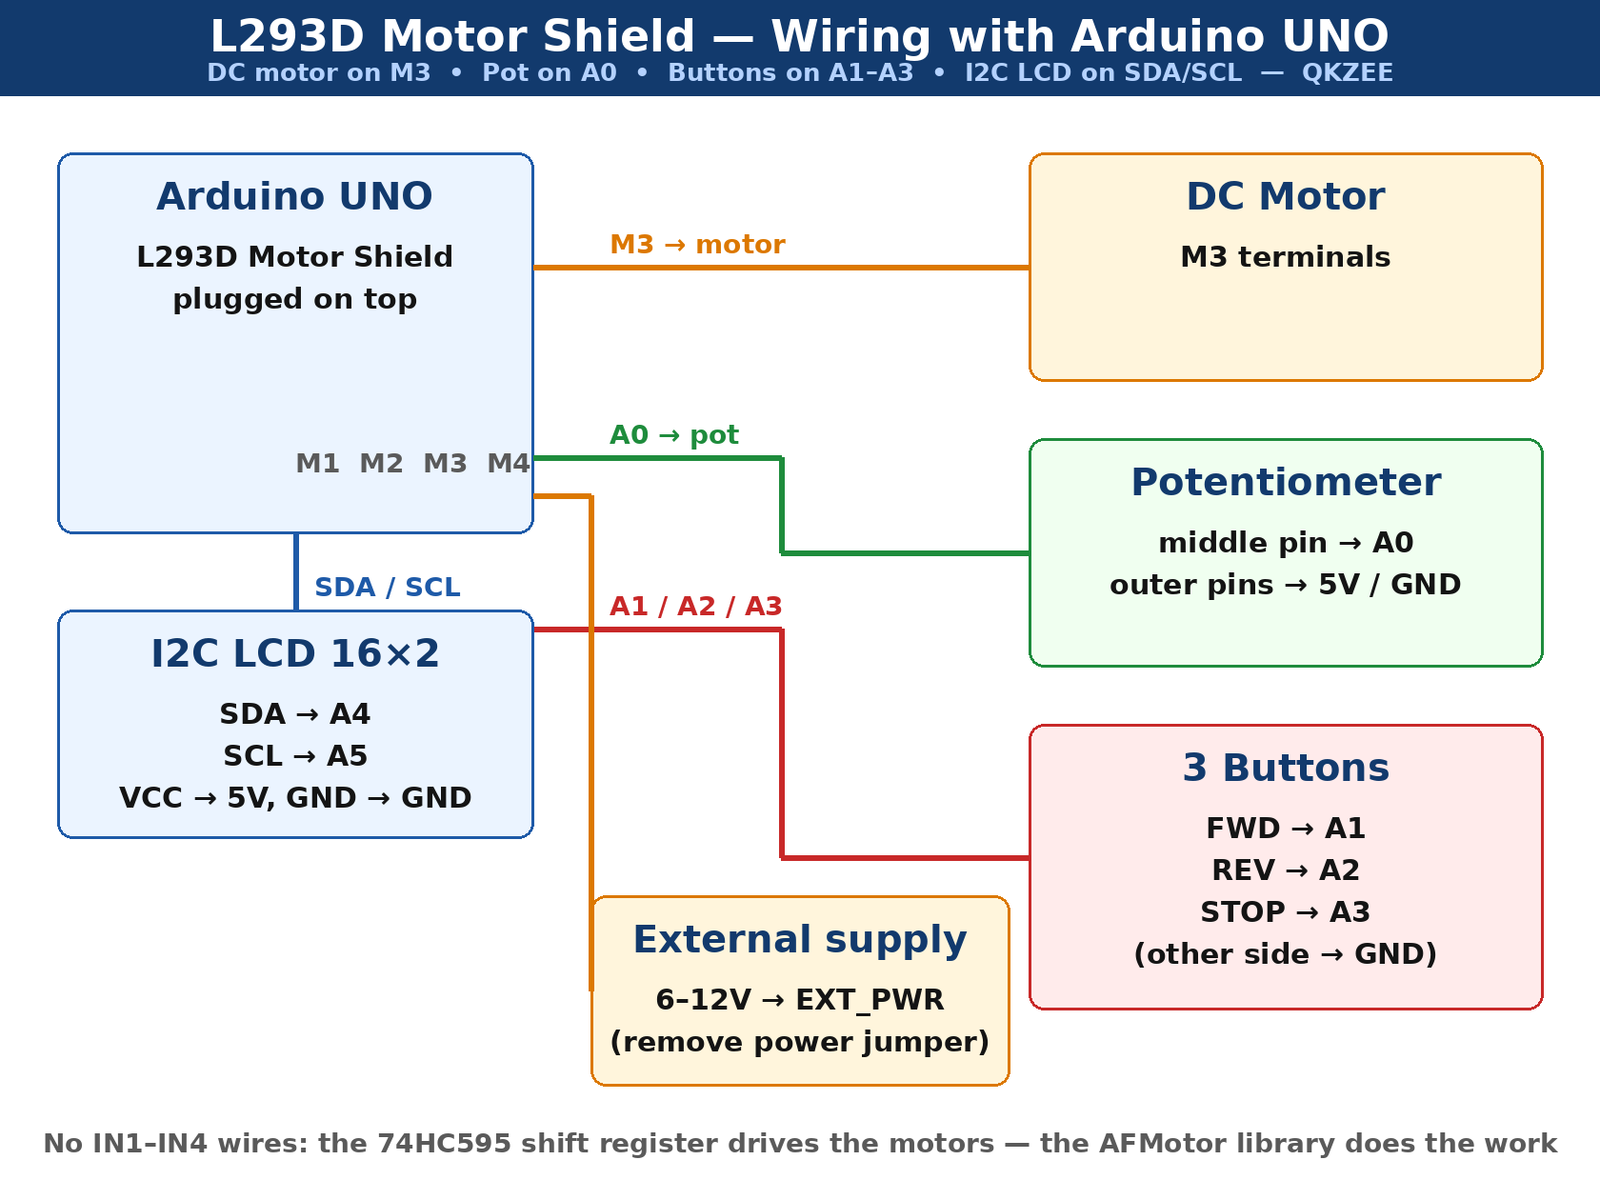
Important: there are NO direct IN1–IN4 wires from the Arduino to this shield. On a bare L293D chip you wire IN1–IN4 yourself, but on this shield the 74HC595 shift register drives the motors — the Arduino talks to the shield over a few pins (latch, clock, data and PWM) and the AFMotor library does the rest. If you are looking for IN1–IN4 pins on the shield, you will not find them — that is normal.
The L293D Motor Driver Shield is a versatile and popular component designed for controlling various types of motors in Arduino projects. It simplifies motor operations, especially when dealing with DC motors, by acting as a reliable interface between the Arduino and the motors.
This tutorial covers how to control a DC motor using the L293D Motor Driver Shield and Arduino. To set it up, you simply mount the shield onto your Arduino, connect your motor wires to the output pins, and upload a control code. The L293D handles the power and direction control efficiently, making it ideal for projects like robots, conveyor belts, or any automated system requiring precise motor control.
Connecting a DC Motor to an Arduino Uno using the L293D Motor Driver Shield opens up a world of possibilities for motor control. Whether you're working with speed adjustments or directional changes, integrating components like an I2C LCD display, potentiometer (POT), and buttons adds precision and flexibility to your project. Below is a simplified guide to setting up this system for seamless operation.
| Component | Purpose | Price / link |
|---|---|---|
| Arduino Uno | Main controller | Arduino UNO R3 DIP — Rs 1,200 |
| L293D Motor Driver Shield | Motor driver (two L293D + 74HC595) | Rs 490 |
| DC gear motor | The motor (connect to M3) | Rs 165 |
| 16×2 LCD with I2C | Visual feedback | Rs 660 |
| Tactile push buttons | FWD / REV / STOP (×3) | Rs 10 each |
| Potentiometer (10k) | Speed adjustment | Available on order — message us on WhatsApp |
| Breadboard | Prototyping | MB102 — Rs 250 |
| Jumper wires | Connections | Rs 180 |
| 12V 2A adapter | External motor power | Rs 275 |
By setting up these components with proper connections and leveraging the versatility of the L293D Motor Driver Shield, you can create a reliable and efficient motor control system tailored to your project's needs.
#include <AFMotor.h>            // Library to run DC Motor Using Motor Driver Shield
#include <Wire.h>
#include <LiquidCrystal_I2C.h>  // Library to Run I2C LCD

LiquidCrystal_I2C lcd(0x27, 16, 2);  // Format -> (Address, Columns, Rows)

// Create the motor object connected to M3
AF_DCMotor motor(3);

// Define button pins
const int forwardButtonPin = A1;
const int reverseButtonPin = A2;
const int stopButtonPin    = A3;

// Define potentiometer pin
const int potPin = A0;

// Variables to store motor state and direction
bool motorRunning  = false;
int  motorDirection = BACKWARD;  // FORWARD or BACKWARD

// Read the potentiometer value
int potValue;
int motorSpeed;

// Variable to store button states
bool forwardButtonState;
bool stopButtonState;
bool reverseButtonState;

// Inline function to check if button is pressed packed with debouncing logic
inline bool chkButtonState(int pinNum, int checkState, int debounceDelay) {
  if (((digitalRead(pinNum) == checkState) ? true : false) == true) {
    delay(debounceDelay);
    return (((digitalRead(pinNum) == checkState) ? (true) : (false)) == true);
  } else {
    return false;
  }
}

void setup() {
  // initialize the lcd
  lcd.init();
  // Turn on the Backlight
  lcd.backlight();
  // Clear the display buffer
  lcd.clear();
  // Set cursor (Column, Row)
  lcd.setCursor(0, 0);
  lcd.print("DC Motor using");
  lcd.setCursor(0, 1);
  lcd.print("L293D Shield");

  // Set button pins as inputs
  pinMode(forwardButtonPin, INPUT_PULLUP);
  pinMode(stopButtonPin,    INPUT_PULLUP);
  pinMode(reverseButtonPin, INPUT_PULLUP);

  // Start with motor off
  motor.setSpeed(0);
  motor.run(RELEASE);
  delay(2000);

  // Clear the display buffer
  lcd.clear();
  // Set cursor (Column, Row)
  lcd.setCursor(0, 0);
  lcd.print("Motor Direction:");
  lcd.setCursor(0, 1);
  lcd.print("Stopped   ");
}

void loop() {
  // Read the potentiometer value for changing speed as per Analog input
  potValue   = analogRead(potPin);
  motorSpeed = map(potValue, 0, 1023, 0, 255);

  // Read the button states
  forwardButtonState = chkButtonState(forwardButtonPin, LOW, 20);
  reverseButtonState = chkButtonState(reverseButtonPin, LOW, 20);
  stopButtonState    = chkButtonState(stopButtonPin,    LOW, 20);

  // check for Forward run
  if (forwardButtonState && (!motorRunning || motorDirection == BACKWARD)) {
    // Set cursor (Column, Row)
    lcd.setCursor(0, 1);
    lcd.print("Clock   ");

    if (motorDirection == BACKWARD) {
      motor.setSpeed(0);
      motor.run(RELEASE);
      delay(1000);
    }

    motorRunning = true;
    motorDirection = FORWARD;
    motor.setSpeed(motorSpeed);
    motor.run(FORWARD);
  }

  // check for Reverse run
  else if (reverseButtonState && (!motorRunning || motorDirection == FORWARD)) {
    // Set cursor (Column, Row)
    lcd.setCursor(0, 1);
    lcd.print("Anti-Clk");

    if (motorDirection == FORWARD) {
      motor.setSpeed(0);
      motor.run(RELEASE);
      delay(1000);
    }

    motorRunning = true;
    motorDirection = BACKWARD;
    motor.setSpeed(motorSpeed);
    motor.run(BACKWARD);
  }

  // Stop motor
  else if (stopButtonState && motorRunning) {
    // Set cursor (Column, Row)
    lcd.setCursor(0, 1);
    lcd.print("Stopped         ");

    motorRunning = false;
    motor.setSpeed(0);
    motor.run(RELEASE);
  }

  // Adjust motor speed if running and display speed on LCD
  if (motorRunning) {
    motor.setSpeed(motorSpeed);
    // Set cursor (Column, Row)
    lcd.setCursor(9, 1);
    lcd.print("SPD:");
    lcd.print(((motorSpeed * 100) / 255));
    lcd.print("%  ");
  }
}
How the code works: the potentiometer on A0 sets the speed (0–255), the three buttons on A1/A2/A3 select forward, reverse or stop, and the LCD shows the direction and the speed as a percentage. The buttons use the Arduino's internal pull-up resistors (INPUT_PULLUP), so a pressed button reads LOW — that is why the code checks for LOW. When the direction changes, the code stops the motor for one second first — reversing a spinning DC motor instantly can damage the gears.
For a complete robot car that uses a motor driver and an ultrasonic sensor, see our obstacle-avoidance robot car guide. And if you want to control a single DC motor's speed without a shield, see our DC motor speed control guide — it uses a MOSFET instead.
The Arduino UNO R3 DIP (Rs 1,200), L293D motor driver shield (Rs 490), DC gear motor (Rs 165), 16×2 LCD with I2C (Rs 660), tactile push buttons (Rs 10 each), MB102 breadboard (Rs 250), jumper wires (Rs 180) and 12V 2A adapter (Rs 275) are available at QKZEE Technologies, Shop 20, 1st Floor, Al-Khalil Center, Hall Road, Lahore, and online at qkzeetech.com with delivery all over Pakistan — see the links above. The potentiometer is available on order — message us on WhatsApp and we will arrange it for you.
If the motor does not move, or the LCD stays blank, message us — tell us whether the external supply is connected, whether the power jumper is removed, and what the LCD shows, and we will help you find the fault.
Chat on WhatsAppSubscribe on YouTube
How many motors can the L293D shield control?
Up to four DC motors or two stepper motors (two L293D chips, two motors each). It also has two servo connections.
Why are there no IN1–IN4 pins on the shield?
Because the shield uses a 74HC595 shift register to drive the motors. The Arduino talks to the shield over a few pins and the AFMotor library handles the direction logic — you never wire IN1–IN4 yourself on this shield.
Why does the motor not move when the Arduino is powered by USB?
USB power (5V, 500 mA) is usually not enough for a motor. Connect an external 6–12V supply to the shield's EXT_PWR terminals and remove the power jumper.
What happens if I leave the power jumper on with an external supply?
The external supply feeds back into the Arduino's 5V rail, which can damage the Arduino and the USB port. Always remove the jumper when using EXT_PWR.
Can I use this shield with a stepper motor?
Yes — the shield controls up to two stepper motors (one per L293D chip). Use the AF_Stepper class from the same AFMotor library instead of AF_DCMotor.
Which library do I need?
The AFMotor library (for the motors) and LiquidCrystal_I2C (for the LCD). Install both from the Arduino IDE Library Manager. The code will not compile without them — the old post had the #include lines with the library names stripped out.
The L293D motor shield is the fastest way to drive motors from an Arduino: plug it on, connect the motor to M3, add an external supply, and the AFMotor library does the rest. Remember the three things that trip everyone up — the external supply with the jumper removed, the I2C address (0x27 or 0x3F), and that there are no IN1–IN4 wires on this shield. That is the whole project, and it works.
