- +92-302-8577025
- qkzeetech@gmail.com
- shop 20, 1st floor Al-khalil Center Hall Road , Lahore
Ultrasonic sensors are the hidden gems of the sensor world. These nifty devices use sound waves to detect objects and measure distances, making them perfect for a wide range of projects for beginners, students, and engineering enthusiasts. Whether you're building an autonomous robot or designing a parking sensor system, ultrasonic sensors can be the secret ingredient to take your DIY projects to the next level. In this article, we'll explore what ultrasonic sensors are, how they work, and how to use them with Arduino. We'll also dive into the differences between ultrasonic sensors and PIR motion sensors to help students, especially in Lahore, Pakistan, find the best way to integrate these technologies into their school and final year engineering projects.
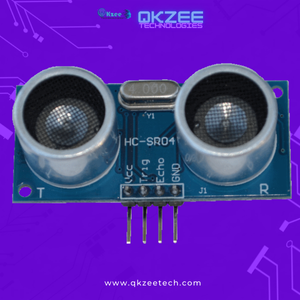
An ultrasonic sensor is a device that measures the distance to an object by using sound waves. It emits a high-frequency sound wave and measures the time it takes for the sound to bounce back after hitting an object. Ultrasonic sensors are great for students and hobbyists working on DIY projects because they can "see" objects without needing physical contact. Plus, they're widely available at cheap prices online from stores like QKZee Technologies in Lahore, Pakistan, and perfect for beginners learning about sensors and modules.
The principle behind ultrasonic sensors is simple but effective. They rely on sound waves at frequencies higher than the human ear can detect—usually above 20,000 Hz. The sensor emits a sound pulse, waits for it to reflect from an object, and measures the time taken for this round-trip journey. This makes ultrasonic sensors easy for students to understand distance measurement concepts in their projects.
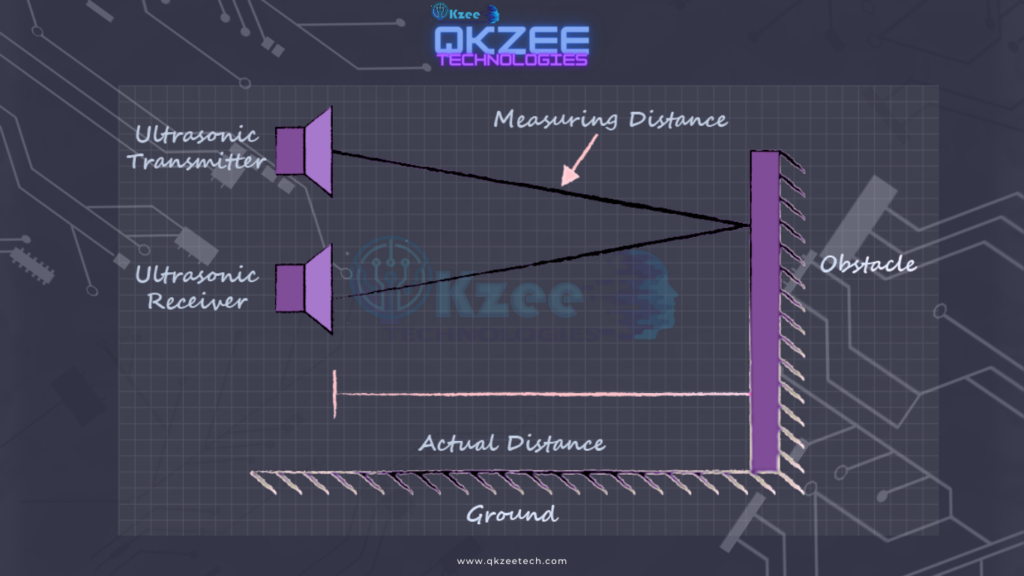
Sound travels through the air at roughly 343 meters per second. By knowing the speed of sound and the time it takes for the sound pulse to return, the sensor calculates the distance to the object. The formula used is:
Distance = (Time x Speed of Sound) / 2
This makes learning easy for beginners and science students who want to explore simple yet practical engineering principles.
Ultrasonic sensors send out a trigger pulse, typically lasting around 10 microseconds. When the sound wave hits an object, it reflects, and the sensor listens for this echo. The time difference between sending the pulse and receiving the echo is proportional to the distance. This is an effective solution for school and DIY projects where students need an easy way to measure distances without complex sensors.
Ultrasonic sensors are incredibly versatile and have entered numerous industries and projects. Here are some key areas where these sensors shine, especially for students and engineering projects:
In the automotive world, ultrasonic sensors are widely used for parking sensors. They help drivers detect nearby objects when parking by emitting an audible beep when the vehicle gets too close to an obstacle. Students can easily replicate this in their final year projects to showcase real-world applications of the sensor.
Robots use ultrasonic sensors to navigate through environments and avoid obstacles. These sensors are an essential part of autonomous navigation systems, allowing robots to "see" the world without cameras. Robotics projects, whether for school or engineering students, can benefit greatly from ultrasonic sensors. See our obstacle-avoidance robot car guide — it uses the HC-SR04 to detect obstacles and steer around them.
In industrial settings, ultrasonic sensors can monitor levels of liquids in tanks, detect objects on production lines, and control automated systems by providing real-time distance measurements. Students working on industrial or control system projects will find these sensors ideal for their automation modules.
One of the best things about ultrasonic sensors is how easily they can be integrated with Arduino for DIY electronics and engineering projects. Whether you're a student building an obstacle-avoiding robot or designing a parking assist system for your final year project, connecting an ultrasonic sensor to Arduino is straightforward.
A typical ultrasonic sensor, like the HC-SR04, has four pins:
This simple pin configuration makes it an easy way for beginners to get started with sensor modules in their Arduino projects.
Once the sensor is connected, you can write a simple code in the Arduino IDE to measure the distance. Here's a basic sketch to get you started, perfect for students new to Arduino projects:
const int trigPin = 7;
const int echoPin = 6;

long duration;
int distance;

void setup() {
  pinMode(trigPin, OUTPUT);
  pinMode(echoPin, INPUT);
  Serial.begin(9600);
}

void loop() {
  digitalWrite(trigPin, LOW);
  delayMicroseconds(2);
  digitalWrite(trigPin, HIGH);
  delayMicroseconds(10);
  digitalWrite(trigPin, LOW);

  duration = pulseIn(echoPin, HIGH);
  distance = duration * 0.034 / 2;

  Serial.print("Distance: ");
  Serial.println(distance);

  delay(1000);
}This code sends out a trigger pulse, listens for the echo, and calculates the distance to an object. It's one of the best and simplest ways for students to experiment with distance measurement in their projects. The 0.034 in the formula is the speed of sound in centimetres per microsecond (343 m/s), and dividing by 2 accounts for the round trip — the sound travels to the object and back.
Ultrasonic sensors provide precise distance measurements, typically ranging from a few centimeters to several meters. PIR (Passive Infrared) motion sensors, on the other hand, detect motion by measuring changes in infrared radiation within a specific area. PIR sensors are great for detecting movement but don't provide accurate distance information, making ultrasonic sensors a better choice for distance-based projects.
| Component | Purpose | Price / link |
|---|---|---|
| HC-SR04 ultrasonic sensor | Distance measurement | Rs 200 |
| Arduino Uno | Main controller | Arduino UNO R3 DIP — Rs 1,200 |
| Jumper wires | Connections | Rs 180 |
| Breadboard | Prototyping | MB102 — Rs 250 |
| PIR motion sensor | Motion detection (for comparison) | Available on order — message us on WhatsApp |
The HC-SR04 ultrasonic sensor (Rs 200), Arduino UNO R3 DIP (Rs 1,200), jumper wires (Rs 180) and MB102 breadboard (Rs 250) are available at QKZEE Technologies, Shop 20, 1st Floor, Al-Khalil Center, Hall Road, Lahore, and online at qkzeetech.com with delivery all over Pakistan — see the links above. The PIR motion sensor is available on order — message us on WhatsApp and we will arrange it for you.
If the sensor always reads 0 cm, or the distance never changes, message us — tell us which pins the Trigger and Echo are on, whether the sensor is powered from 5V, and what the Serial Monitor shows, and we will help you find the fault.
Why does my HC-SR04 always read 0 cm?
The Echo pin is not receiving anything — check the wiring (Trigger to pin 7, Echo to pin 6), make sure the sensor is powered from 5V, and check that nothing is blocking the two "eyes" on the front of the module.
Why does the distance jump around?
Soft or angled surfaces reflect sound poorly, and the sensor can pick up echoes from nearby objects. Point it at a flat, hard surface (like a wall or a book) and test again. The HC-SR04 is most accurate between about 2 cm and 400 cm.
Can I use the HC-SR04 with an ESP32 or ESP8266?
Yes, but the Echo pin outputs 5V — the ESP32's pins are 3.3V only, so use a voltage divider (1k + 2k resistors) on the Echo line, the same as with an HC-05 or a NodeMCU.
What is the difference between an ultrasonic sensor and a PIR sensor?
An ultrasonic sensor measures distance by sending sound and timing the echo. A PIR sensor detects motion by sensing changes in infrared (body heat) — it tells you something moved, but not how far away it is.
Do I need a resistor or any extra part to use the HC-SR04?
No — the module connects directly to the Arduino (VCC to 5V, GND to GND, Trigger and Echo to digital pins). No resistor is needed on an Arduino UNO.
Can I use two HC-SR04 sensors on one Arduino?
Yes — give each sensor its own Trigger and Echo pins, and trigger them one at a time (with a short delay between them) so their sound pulses do not interfere with each other.
Ultrasonic sensors are versatile, easy to use, and perfect for a wide range of applications. Whether you're building an obstacle-avoiding robot, creating a parking assist system, or automating industrial processes, these sensors provide reliable, accurate measurements. When combined with Arduino, ultrasonic sensors open up endless possibilities for your DIY electronics projects. For more project ideas that use this sensor, see our Top 10 final year project ideas.