- +92-302-8577025
- qkzeetech@gmail.com
- shop 20, 1st floor Al-khalil Center Hall Road , Lahore
Water management has become a global concern, and modern agriculture requires smarter solutions. An IoT-based smart irrigation system using ESP8266 and Blynk is suitable for student projects, final-year projects and semester projects. Unlike traditional irrigation systems, this IoT project uses Wi-Fi connectivity to monitor soil moisture in real time and control water pumps directly from a smartphone.
Water management has become a global concern, and modern agriculture requires smarter solutions. An IoT-based smart irrigation system using ESP8266 and Blynk is suitable for student projects, final-year projects and semester projects. Unlike traditional irrigation systems, this IoT project uses Wi-Fi connectivity to monitor soil moisture in real time and control water pumps directly from a smartphone.
An IoT smart irrigation system uses an ESP8266 microcontroller and the Blynk IoT app to automate water supply. The soil moisture sensor collects data, and the ESP8266 NodeMCU sends it to the Blynk cloud, where users can check moisture levels and control pumps remotely.
This makes it a powerful choice for agriculture projects and IoT projects in universities of Pakistan.
Agriculture consumes the majority of freshwater worldwide. Traditional irrigation wastes thousands of liters daily. By adopting ESP8266 IoT smart irrigation systems:
This is why universities, student projects and final year projects in Pakistan increasingly include IoT irrigation systems in their curriculum.
Moisture-based irrigation ensures no overwatering.
All parts are easily available at QKZEE Technologies, Hall Road, Lahore, and electronics shops across Pakistan.
From a small garden to large farms, this IoT solution works everywhere.
Students can view soil data, pump status and even control irrigation remotely through the Blynk IoT app.
| Component | Price / link |
|---|---|
| ESP8266 NodeMCU — main microcontroller with Wi-Fi | Rs 590 |
| Soil moisture sensor — detects soil dryness | Rs 155 |
| 1-channel relay module — controls the water pump | Rs 155 |
| Mini 5V DC water pump — provides irrigation | Rs 250 |
| Silicone pipe (per foot) — carries water from the pump to the plants | Rs 50 |
| Jumper wires + MB102 breadboard — for easy circuit connections | Rs 180 / Rs 250 |
| Blynk IoT app — mobile app for monitoring and control | Free on your phone |
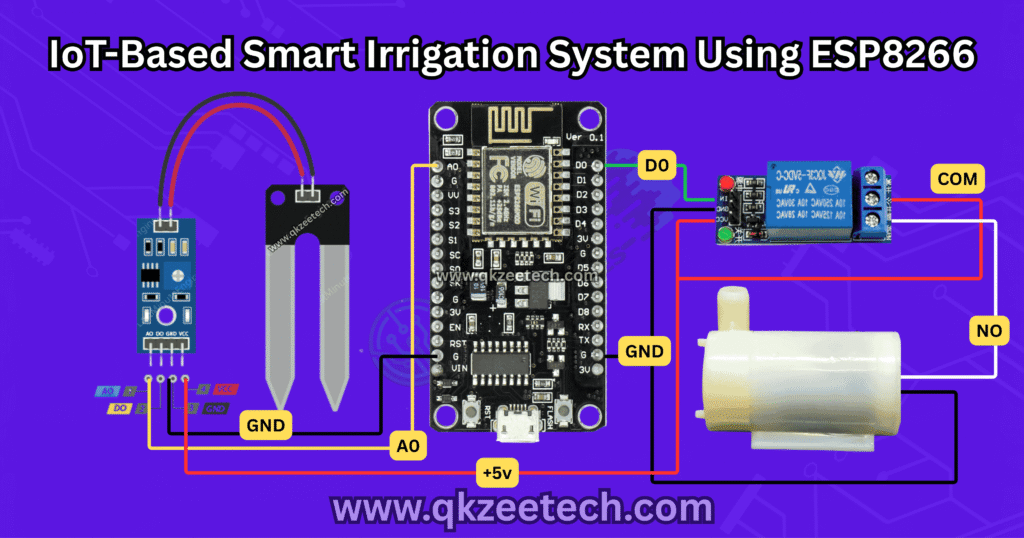
| Connection | Where it goes |
|---|---|
| Soil moisture sensor VCC | NodeMCU 5V (VIN) |
| Soil moisture sensor GND | NodeMCU GND |
| Soil moisture sensor A0 | NodeMCU A0 |
| Relay module VCC | NodeMCU 5V |
| Relay module GND | NodeMCU GND |
| Relay module IN | NodeMCU D0 |
| Relay COM | 5V supply + |
| Relay NO | Pump + (one wire) |
| Pump − (other wire) | 5V supply − (GND) |
The pump runs from the 5V supply. For a small 5V pump this is fine; for a bigger pump, use a separate 5V supply with enough current and join its GND to the NodeMCU's GND.
Watch the complete video of the IoT-Based Smart Irrigation System Using ESP8266 & Blynk project on YouTube: IoT Smart Irrigation System video (opens in a new tab).
Here's a complete program to connect the ESP8266 with Blynk IoT and control irrigation automatically.
⚠️ The sensor logic was backwards in the old code — read this before you upload. A soil moisture sensor's analog output reads HIGH when the soil is DRY and LOW when it is WET (dry soil conducts less, so the sensor's output voltage is higher). The old code turned the pump ON when the reading was below the threshold — that waters wet soil and leaves dry soil dry. The corrected code below turns the pump ON when the reading is above the threshold (dry soil) and OFF when it drops below it (wet soil). The old BLYNK_DEVICE_NAME line is also removed — it is a deprecated Blynk 1.0 define; Blynk 2.0 uses BLYNK_TEMPLATE_ID only.
#define BLYNK_TEMPLATE_ID "Your_Template_ID"
#define BLYNK_AUTH_TOKEN "Your_Blynk_Token"

#include <ESP8266WiFi.h>
#include <BlynkSimpleEsp8266.h>

char auth[] = BLYNK_AUTH_TOKEN;
char ssid[] = "Your_WiFi_SSID";
char pass[] = "Your_WiFi_Password";

int sensorPin = A0;
int relayPin = D0;
int sensorValue = 0;
int threshold = 400;

void setup() {
  Serial.begin(115200);
  Blynk.begin(auth, ssid, pass);
  pinMode(relayPin, OUTPUT);
  digitalWrite(relayPin, HIGH);   // pump OFF initially (most modules are active LOW)
}

void loop() {
  Blynk.run();
  sensorValue = analogRead(sensorPin);
  Blynk.virtualWrite(V1, sensorValue);

  if (sensorValue > threshold) {
    digitalWrite(relayPin, LOW);    // dry soil — pump ON
    Blynk.virtualWrite(V2, 1);
  } else {
    digitalWrite(relayPin, HIGH);   // wet soil — pump OFF
    Blynk.virtualWrite(V2, 0);
  }

  delay(2000);
}
This program shows soil moisture data on Blynk (V1) and pump status on Blynk (V2). Replace "Your_Template_ID", "Your_Blynk_Token", "Your_WiFi_SSID" and "Your_WiFi_Password" with your own Blynk project values before uploading. The threshold (400) is a starting point — check your own sensor's readings in dry and wet soil with the Serial Monitor and adjust it. See our guide: ESP8266 IoT Soil Test Station — it reads the same soil sensor and uploads the data to ThingSpeak.
With these upgrades, the project is future-ready for Pakistani agriculture and global IoT farming solutions.
IoT farming in Pakistan universities will expand with:
The IoT-based smart irrigation system using ESP8266 and Blynk is among the best projects for students, universities and farmers. Students from Hall Road to top universities in Pakistan are building this as a final year project, semester project or agriculture IoT project.
It's affordable, scalable and practical — making it one of the most impactful IoT projects in Pakistan universities today.
The NodeMCU (Rs 590), soil moisture sensor (Rs 155), relay module (Rs 155), mini 5V water pump (Rs 250), silicone pipe (Rs 50 per foot), jumper wires (Rs 180) and MB102 breadboard (Rs 250) are available at QKZEE Technologies, Shop 20, 1st Floor, Al-Khalil Center, Hall Road, Lahore, and online at qkzeetech.com with delivery all over Pakistan — see the links above. The pump-and-relay control in this project is the same as our automatic tap water system — it switches a pump with a relay when a sensor triggers.
If the pump never turns on, or it runs all the time, message us — tell us what the Serial Monitor shows for the sensor value in dry and wet soil, and whether the relay clicks, and we will help you find the fault.
Chat on WhatsApp Watch on YouTube
Why does my pump run all the time?
The sensor logic is probably backwards. Dry soil reads HIGH and wet soil reads LOW — the pump must turn ON when the reading is ABOVE the threshold. If your code turns it on below the threshold, it waters wet soil. Check the corrected code above.
Why does the pump never turn on?
Check three things: the sensor is wired to A0 (not D0), the relay IN is wired to D0, and the relay clicks when the soil is dry. Also check the threshold — read the sensor value in dry and wet soil with the Serial Monitor and set the threshold between the two readings.
What does the threshold value mean?
It is the sensor reading that separates "dry" from "wet". Dry soil reads high (often 700–1023) and wet soil reads low (often 200–400). The default 400 is a starting point — adjust it for your soil.
Can I use an Arduino UNO instead of a NodeMCU?
Yes for the sensor and relay, but the UNO has no Wi-Fi — you lose the Blynk monitoring unless you add a Wi-Fi module. The NodeMCU has Wi-Fi built in, which is why this guide uses it.
How much water does this save?
It waters only when the soil is dry, instead of on a fixed timer. The exact saving depends on your soil and plants, but moisture-based watering always uses less than scheduled watering.
Do I need the Blynk app?
No — the automatic mode works without it (the NodeMCU reads the sensor and switches the pump itself). Blynk adds remote monitoring and manual control from your phone.
An IoT smart irrigation system is one of the best first IoT projects: one sensor, one relay, one pump and a phone app. Learn the sensor's behaviour — dry reads high, wet reads low — set the threshold from your own readings, and test it in a pot before you put it in a field. That is the whole project, and it works.