- +92-302-8577025
- qkzeetech@gmail.com
- shop 20, 1st floor Al-khalil Center Hall Road , Lahore
If you're working on student projects, final year projects (FYP) or DIY electronics, you'll often need a reliable 5V power supply. Many devices like Arduino boards, sensors and microcontrollers require 5V DC. However, most batteries or adapters provide 12V DC. This guide will show you how to build a simple, cost-effective 12V to 5V DC converter using the 7805 voltage regulator.
The 7805 is a linear voltage regulator IC that converts higher DC voltages (7V to 35V) to a stable 5V output. It's affordable, easy to use and widely available at electronics stores like Hall Road, Lahore. Whether you're building Arduino projects or prototyping circuits for school projects, the 7805 is a go-to component for beginners and experts alike.
| Component | Specification | Purpose |
|---|---|---|
| 7805 Voltage Regulator IC | The core component of this project. It regulates the input voltage (12V) to a steady 5V output. | Available on order — message us on WhatsApp |
| Capacitors | 1000µF (input), 0.1µF and 100µF (output) | Filter noise and stabilise voltage — available on order, message us on WhatsApp |
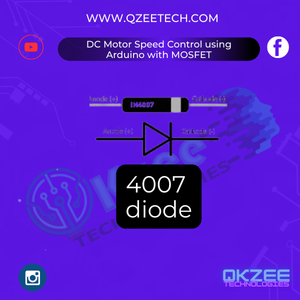
| 1N4007 Diode | Reverse-polarity protection at the input | Available on order — message us on WhatsApp |
| Heat Sink | For the 7805 | Prevents overheating — available on order, message us on WhatsApp |
| Resistors (optional) | 220Ω for the LED indicator | Current-limiting / LED indicator — available on order, message us on WhatsApp |
| PCB or Breadboard | MB102 breadboard | For assembling the circuit — Rs 250 |
| 12V Power Source | 12V 2A AC-DC adapter (or a 12V battery) | Input power — Rs 275 |
| Connecting Wires | Jumper wires | To link components on the breadboard — Rs 180 |
If you want a ready-made step-down module instead of building with a 7805, see the LM2596 DC-DC buck converter module (Rs 165) — it does the same job with much less heat.

The 7805 has three pins:

Here's a basic schematic:
| Connection | Where it goes |
|---|---|
| 12V source + | 1N4007 diode anode |
| 1N4007 diode cathode | 7805 Pin 1 (Input) |
| 1000µF capacitor | Between Pin 1 and GND |
| 7805 Pin 2 | GND |
| 0.1µF + 100µF capacitors | Between Pin 3 (Output) and GND |
| LED anode (+) via 220Ω resistor | 7805 Pin 3 (Output) |
| LED cathode (−) | GND |
The diode wiring was confusing in the old post — here is what it actually does. The 1N4007 goes in series with the 12V input: its anode connects to the 12V source and its cathode connects to the 7805 Pin 1. It is a reverse-polarity guard — if you connect the 12V source backwards by mistake, the diode blocks the current and the 7805 is protected. It is not wired "to Pin 1 as forward-biased" in parallel; it sits in the input line itself.

For prototyping, use a breadboard. For permanent setups, design a PCB using software like Eagle or KiCad. See our breadboard tutorial if you have never used a breadboard before — it shows how the power rails and terminal strips connect.
Attach a heat sink to the 7805 to dissipate heat. Without it, the IC may overheat and fail. The 7805 burns the extra voltage as heat: (12V − 5V) × current — at 500mA that is 3.5W, which is a lot of heat for a bare IC.
Use a multimeter to check the output voltage. If it reads 5V ± 0.25V, the circuit works!
If the 7805 gets too hot, ensure the input voltage isn't too high (ideally 7V–12V). Use a larger heat sink or a switching regulator for high-current applications.
If the output is below 5V, check for loose connections or faulty capacitors.
Add a 100µF electrolytic capacitor at the output for better filtering.
Power Arduino Uno, ESP8266 or sensors in IoT and automation projects.
Build portable chargers, LED drivers or small robots.
Ideal for school projects, science projects and engineering prototypes at technical colleges in Pakistan.
This converter is a fundamental project for electrical engineering students. It teaches voltage regulation, circuit design and troubleshooting. Plus, it's a great addition to portfolios for final year projects or internships.
Building a 12V to 5V converter using the 7805 is a simple yet valuable skill for students, hobbyists and engineers. With components from Hall Road, Lahore, or online at QKZEE Technologies, you can create a reliable power supply for Arduino projects, school experiments or industrial prototypes.
If your input is mains (220V AC) instead of 12V DC, you need the transformer version first — see our 220V AC to 5V DC converter using 7805 for the mains circuit that feeds 12V DC into this same 7805 stage.
The MB102 breadboard (Rs 250), 12V 2A adapter (Rs 275), jumper wires (Rs 180) and the LM2596 buck converter module (Rs 165) are available at QKZEE Technologies, Shop 20, 1st Floor, Al-Khalil Center, Hall Road, Lahore, and online at qkzeetech.com with delivery all over Pakistan — see the links above. The 7805, capacitors, 1N4007 diode, heat sink and resistors are available on order — message us on WhatsApp and we will arrange them for you.
If the output is 0V, or the 7805 gets hot immediately, message us — tell us the input voltage, the voltage at Pin 1 and Pin 3, and whether the diode is in the input line, and we will help you find the fault.
Message us on WhatsAppSubscribe on YouTube
Why does the 7805 get so hot?
The 7805 burns the extra voltage as heat: (input voltage − 5V) × current. At 12V in and 500mA out, that is (12 − 5) × 0.5 = 3.5W. Use a heat sink, and for currents above 500mA consider a switching module like the LM2596 instead.
What does the 1N4007 diode do?
It guards against reverse polarity. It sits in series with the 12V input (anode to the source, cathode to the 7805 Pin 1). If you connect the 12V source backwards, the diode blocks the current and the 7805 survives. Without it, a reversed input can destroy the regulator.
Can I use a 9V battery instead of 12V?
Yes — the 7805 needs at least 7V at its input, so 9V works. The output is still 5V. A 9V battery just runs down faster than a 12V adapter.
Do I need all three capacitors?
Yes — the 1000µF at the input smooths the incoming DC, and the 0.1µF + 100µF at the output keep the 5V stable and noise-free. Without them the output can oscillate.
Can I power an Arduino from this?
Yes — the 5V output can power an Arduino through its 5V pin (not the barrel jack, which needs 7–12V). Keep the load under 500mA unless the 7805 has a good heat sink.
Why is my output below 5V?
Check for loose connections or a faulty capacitor first. Also check the input voltage — if it has dropped below 7V (for example, a flat battery), the 7805 cannot regulate and the output sags.
A 12V to 5V converter is one of the most useful power supplies you can build: a diode, three capacitors, a 7805 and a heat sink. Remember the three things that trip everyone up — the diode goes in series at the input (anode to the source), the 1000µF goes at the input and the 0.1µF + 100µF at the output, and the 7805 needs a heat sink above 200mA. That is the whole project, and it works.
